


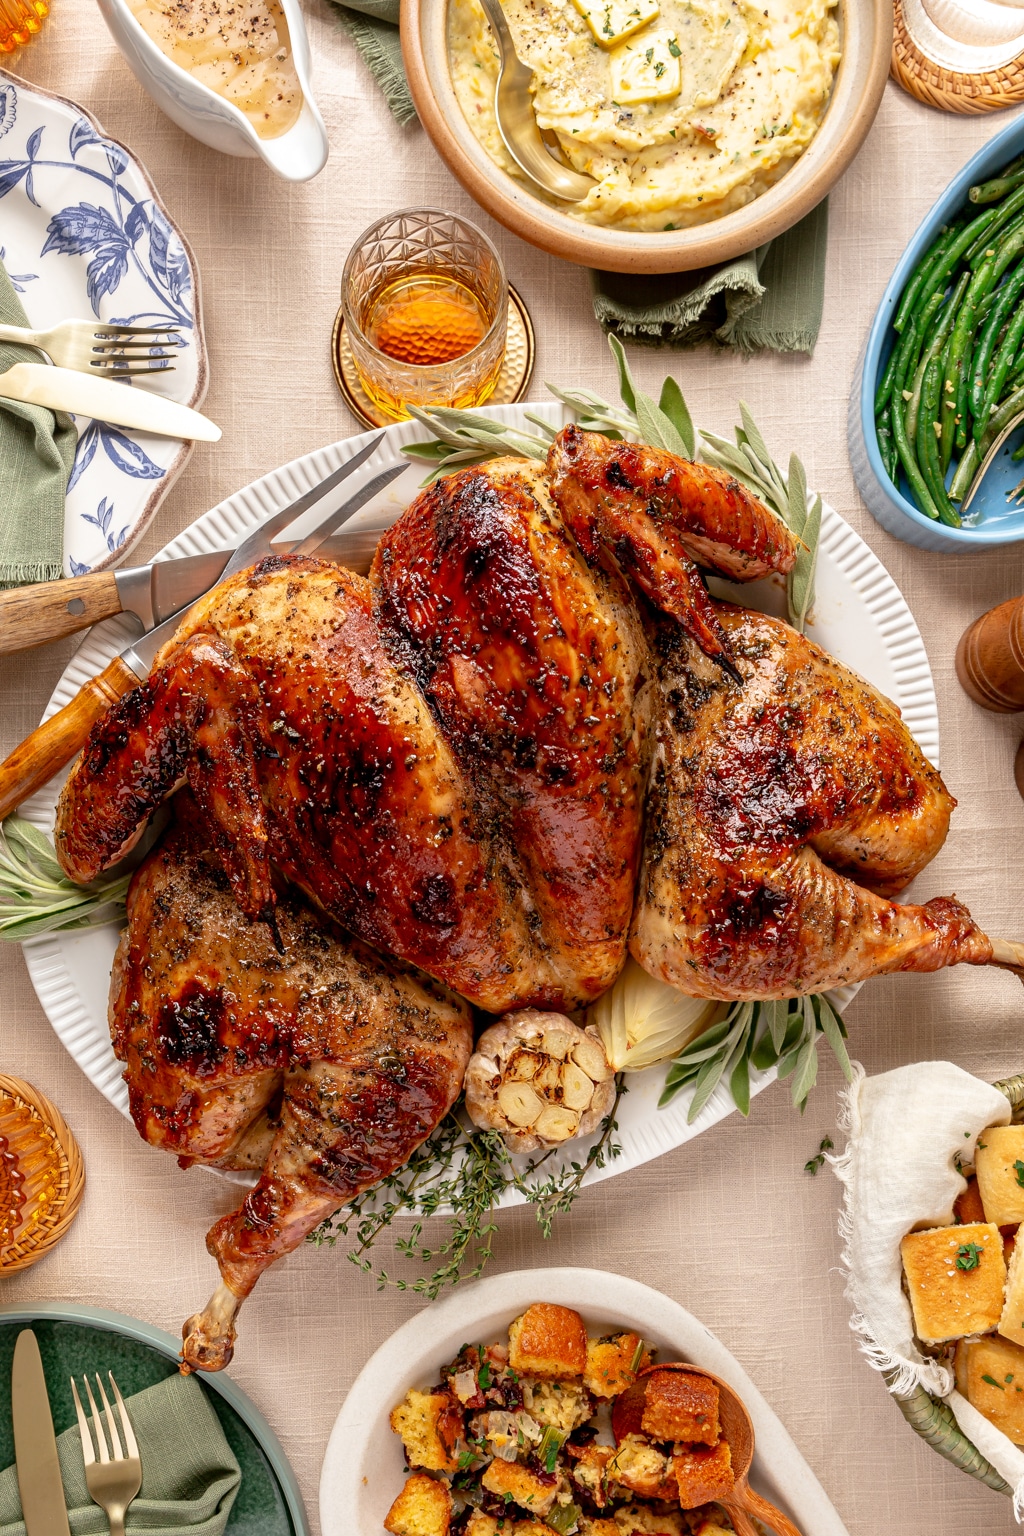
This Maple-Bourbon Glazed Turkey is the show stopping dish you need this Thanksgiving! It’s gloriously juicy throughout and it’s slathered in the most incredible maple-bourbon glaze and roasted to crispy perfection.
Spatchcocking the turkey saves time and oven space and ensures that your turkey cooks evenly throughout (no more dry white meat!). And I cannot say enough about the glaze! It comes together with butter, maple syrup, dijon, sage, thyme, and bourbon–it’s so good you’ll want to put it on everything.
Table of Contents
Juicy Maple-Bourbon Glazed Turkey
Today kicks off Thanksgiving season 2024 for So Much Food! From here on out, I’ll be sharing all my brand new holiday recipes that are sure to make your season extra special.
I have typically been anti-turkey but I was blown away by how good this maple-bourbon glazed turkey turned out! I grew up with kind of boring, dry turkeys (sorry, mom!), but this recipe is decidedly the opposite of boring or dry.
This turkey turned out to be flavorful and juicy with the most perfectly golden brown skin. AND THE GLAZE! It’s honest to goodness magic. The turkey was perfectly seasoned and made the most delicious turkey sandwiches with the leftovers. Once you try this recipe, it’ll be your go-to for all Thanksgivings to come!
Feeling stressed about turkey day? Check out my comprehensive Thanksgiving day guide for recipe inspiration, cooking schedules, and more!
If you need more recipe inspiration, check out my collection of Thanksgiving recipes.
Dry Brine vs Wet Brine
A wet brine is a solution of water, salt, and a little sugar, along with some herbs and spices for flavor. You submerge your meat prior to cooking in the brining solution and through osmosis, the meat absorbs flavor and moisture.
When you season a piece of meat you’re seasoning the outside and the inside doesn’t really absorb that flavor. However, with brining, you’re flavoring the whole piece of meat inside and out.
However, for larger pieces of meat and whole chickens and turkeys, wet brining can be really cumbersome. This is when I opt for a dry brine.
A dry brine is all of the seasonings (salt, sugar, pepper, spices, etc), but without the water. The salt in the dry brine pulls moisture from the meat, dissolves the salt and sugar on the outside, and then re-absorbs that concentrated and flavorful liquid. Dry brining tenderizes the meat and gives you extra crispy skin. The only thing is, you need time for the dry brine to work which is why I recommend seasoning the turkey 24-48 hours in advance.
A dry brine is my preferred method for turkey because you don’t need to find a large container to submerge the turkey in liquid and that’s what I’m using for my maple-bourbon glazed turkey.

Spatchcocking and Why You Should be Doing It
Spatchcocking is a method of preparing your poultry where you remove the backbone from the bird and break the ribs and breast bone so that it lays flat. This process is also referred to as “butterflying.” It may sound ominous, but there is honestly no other way that I prepare poultry anymore. Here are all the reasons you should be spatchcocking your turkey:
Faster cooking. A spatchcocked turkey cooks in HALF the time of a traditional turkey. A 14 lb turkey cooks in about 80 minutes if you spatchcock it, but if you don’t, expect about a 3 hour cook time.
Even cooking. When your turkey cooks flat, you can expect even cooking. No more dry breast meat or undercooked dark meat! All the parts of the bird are evenly exposed and all cook at the same rate.
Better seasoning. With all the parts of the turkey being easily accessible, it’s easy to season every nook and cranny. Normally, much of the turkey legs are sort of hard to get to and they often go under-seasoned, but not anymore! You’ll be able to get that dry brine everywhere.
More room in the oven. A flat turkey means you have way more space in the oven! You won’t have to accommodate a giant roasting pan plus a couple of inches for the turkey and so you’ll be able to cook more sides at the same time, making Thanksgiving dinner a breeze.
How to Make Maple-Bourbon Glazed Turkey
This recipe really is simple to make, with a little prep up-front. You’re going to want to invest in some good poultry shears–essential when spatchcocking. Make sure you also use a thermometer when cooking the turkey!
Tools Needed
- Poultry Shears
- Low-Profile Roasting Pan or Baking Sheet
- Probe Thermometer
- Cutting Board
- Sharp Knife
- Basting Brush
- Small Saucepan
- Drippings/Fat Separator
Step-by-Step Instructions & Photos


- Mix the dry brine. In a small bowl, mix together the salt, pepper, sugar, and sage. Set aside.
- Prep the turkey. First, remove the neck and giblets from the turkey cavity and make sure it’s completely defrosted (if using a frozen turkey). Place the turkey on a large cutting board and pat it very dry with paper towels. Make sure your cutting board is stable–if it doesn’t have rubber feet, place a wet paper towel under the cutting board to keep it from sliding. Arrange the turkey breast-side down on the cutting board with the legs facing you.
- Spatchcock the turkey. Using heavy-duty kitchen shears, cut along one side of the turkey spine, separating it from the ribs. Be sure to cut as close to the spine as you can so that you do not end up discarding any more of the turkey meat than necessary. Repeat on the other side of the spine. Flip the turkey so that the breasts face upward and the legs face outward. Using the palm of your hands, press along the breast bone. You should hear a small crack and the bird should lay flat.
- Coat the turkey with the dry brine. Use your fingers to separate some of the skin from the breast and leg meat to create some space. Rub the salt mixture into the turkey all over, including on the underside and under the skin so that the bird is well coated. Place the turkey on a baking sheet, breast side up, and transfer to the fridge uncovered for 24 hours, up to 48 hours.
- Make the glaze. Combine the butter, maple syrup, dijon, and herbs in a small saucepan. Simmer over medium-low heat until the mixture is thick enough to coat the back of a spoon, about 10 minutes. Remove from the heat and add the bourbon and stir well. Set aside to cool.
- Prep the turkey for roasting. Remove the turkey from the fridge an hour before you plan to cook it. Add the onions, carrots, herbs, and garlic to the bottom of a roasting pan and pour in the wine and turkey stock. Place the turkey, breast side up, in the roasting pan on top of the veggies. Transfer the roasting pan to the oven.
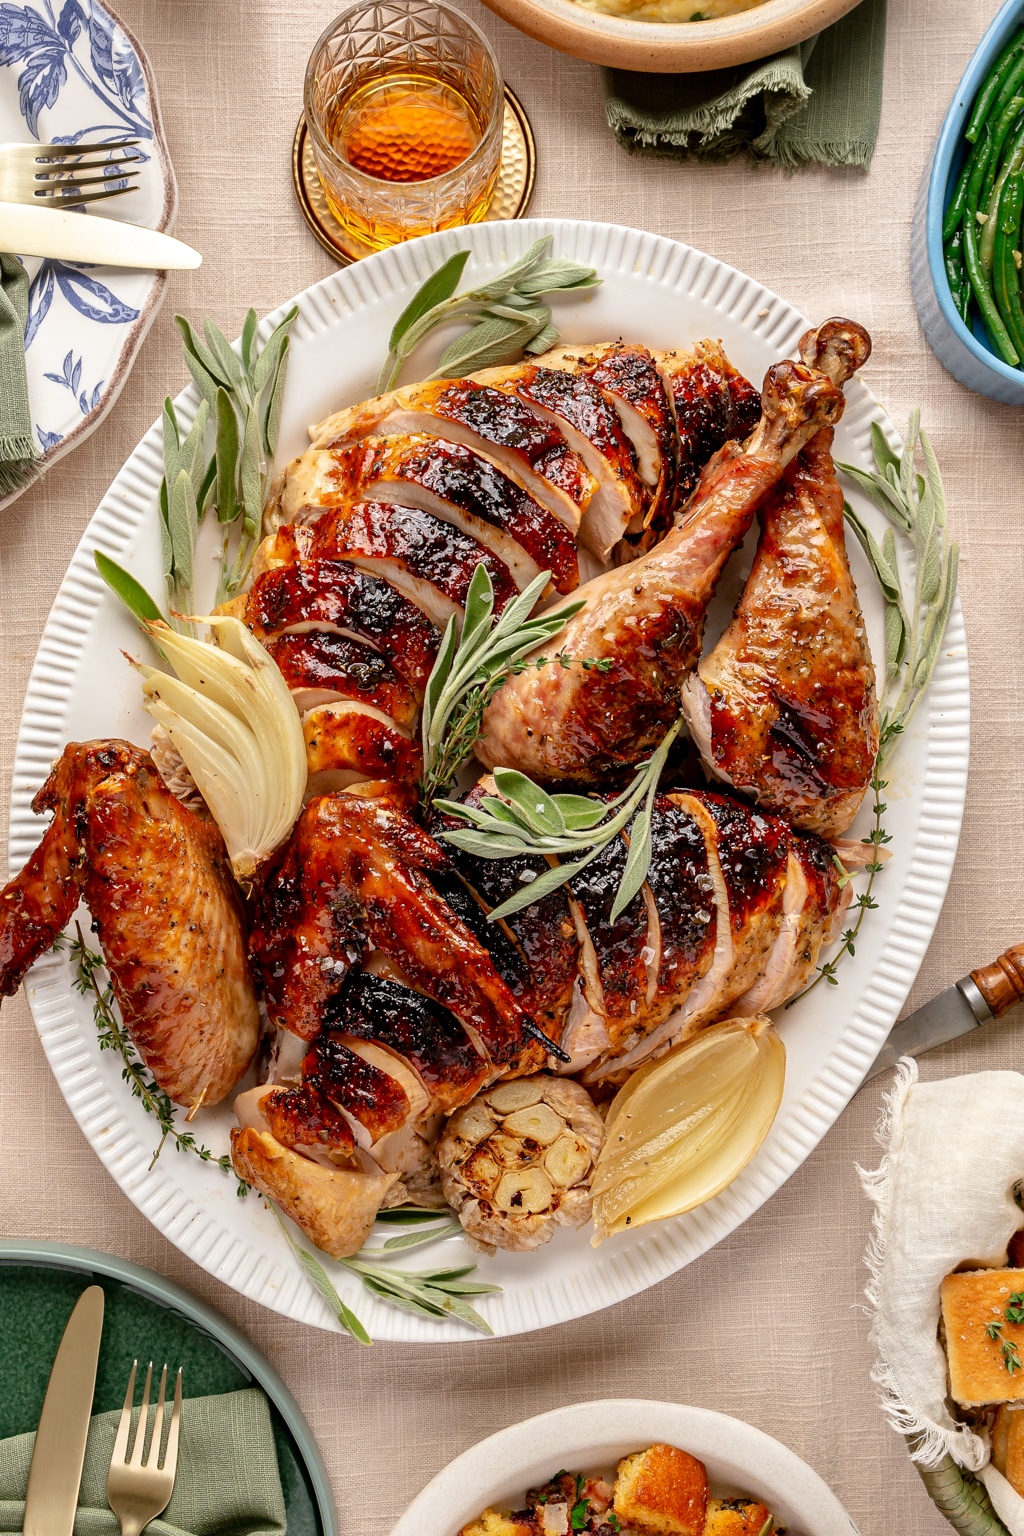
- Roast and baste the turkey. Let the turkey roast for 45 minutes. Then, baste the turkey liberally every 10 minutes with the maple-bourbon butter, until the internal temperature in the thickest part of the turkey leg reaches 160 F, about 80-90 minutes total cooking time. Remove the turkey from the oven and carefully transfer just the turkey to a large cutting board and loosely tent it with foil. Let the turkey rest for 30 minutes before carving.
Selecting the Right Turkey
Knowing how much turkey to cook for your gathering is essential!
A good rule of thumb is to purchase 1lb of turkey per person attending. If you want to have ample leftovers, go for 1 ½ lbs of turkey per person. So a gathering of 10 people would require a 14 lb turkey to ensure everyone has enough and then some to take home.
I always opt for a fresh or heritage breed turkey that hasn’t been injected with any salt solutions. You can verify this information on the packaging but I always recommend supporting your local butcher shops, especially during the holidays.
If you are serving more than 12 people, I recommend cooking 2 turkeys. As you get into much larger birds, they won’t fit in the roasting pan or sheet tray. Two smaller birds will still cook faster than a larger turkey. They can be cooked at the same time, just make sure to rotate the pans in the oven while they’re cooking so they get evenly browned.
Maple-Bourbon Glazed Turkey Cooking Times
The amount of time it takes to cook your maple-bourbon glazed turkey varies because it’s based on the size of your turkey and your oven. On average, plan for 6-8 minutes of cooking time per pound.
Here are average some cook times based on size and weight. These times may vary and are really just a rule of thumb, but they are a good starting point. I highly recommend using a probe-style thermometer because it’s the best way to track the temperature doneness of the bird.
You want to make sure that the temperature in the thigh is at least 160 F. You can pull it a little early because the rest of the carry-over cooking will happen as the turkey rests.
- 10 to 11 pounds: 60-70 minutes
- 11 to 12 pounds: 70-80 minutes
- 12 to 14 pounds: 80-100 minutes
- 14+ pounds: I don’t recommend this method for cooking a large bird and instead would suggest two smaller birds, or using my buttered cheesecloth turkey recipe.


Making Gravy with Turkey Stock & Drippings
The perfect thanksgiving gravy comes from really great stock, so say goodbye to the boxed turkey stock! Because now you’ve got everything you need to make a better and richer version at home.
Make sure to save the turkey neck because that is the key to really great gravy–making rich and flavorful turkey stock.
Get all my tips for making perfect turkey gravy by visiting my Foolproof Turkey Gravy Recipe.
What to Serve with Maple-Bourbon Glazed Turkey
Now that we’ve got the turkey down, it’s time to figure out what to serve alongside it! Because it’s not a party without all the trimmings, here are all my favorite cocktails, appetizers, sides, and desserts for serving alongside my maple-bourbon glazed turkey.
Cocktails
Appetizers
Breads
Sides
- White Cheddar Baked Mac and Cheese
- Green Bean Casserole
- Bacon-Cornbread Stuffing
- Sour Cream & Onion Mashed Potatoes
- Cheesy Hasselback Potato Gratin
- Classic Cranberry Sauce
- Brussels Sprouts Gratin
Desserts


This post contains affiliate links from which I receive a small commission at no additional cost to you. As an Amazon Associate, I earn from qualifying purchases. Affiliate links allow me to keep providing great recipes for free and I never recommend products that I don’t love and personally own.

Maple-Bourbon Glazed Turkey
Ingredients
Dry-Brined Turkey
- 12-14 lb turkey, defrosted
- 1/3 cup kosher salt
- 1 tablespoon freshly ground black pepper
- 2 tablespoons brown sugar
- 1 tablespoon dried rubbed sage
- 2 yellow onions, quartered
- 4 large carrots, roughly chopped
- 1 bulb of garlic, top removed to expose the cloves
- 4 sprigs thyme
- 4 sprigs sage
- 1 1/2 cups turkey stock
- 1 cup white wine
Maple-Bourbon Glaze
- 2 sticks (8 oz) salted butter
- 1/3 cup pure maple syrup
- 1 tablespoon dijon mustard
- 3 tablespoons minced fresh sage leaves
- 1 tablespoon minced fresh thyme leaves
- 3 tablespoons bourbon
Instructions
- Mix the dry brine. In a small bowl, mix together the salt, pepper, sugar, and sage. Set aside.
- Prep the turkey. First, remove the neck and giblets from the turkey cavity and make sure it’s completely defrosted (if using a frozen turkey). Place the turkey on a large cutting board and pat it very dry with paper towels. Make sure your cutting board is stable–if it doesn't have rubber feet, place a wet paper towel under the cutting board to keep it from sliding. Arrange the turkey breast-side down on the cutting board with the legs facing you.
- Spatchcock the turkey. Using heavy-duty kitchen shears, cut along one side of the turkey spine, separating it from the ribs. Be sure to cut as close to the spine as you can so that you do not end up discarding any more of the turkey meat than necessary. Repeat on the other side of the spine. Flip the turkey so that the breasts face upward and the legs face outward. Using the palm of your hands, press along the breast bone. You should hear a small crack and the bird should lay flat.
- Coat the turkey with the dry brine. Use your fingers to separate some of the skin from the breast and leg meat to create some space. Rub the salt mixture into the turkey all over, including on the underside and under the skin so that the bird is well coated. Place the turkey on a baking sheet, breast side up, and transfer to the fridge uncovered for 24 hours, up to 48 hours.
- Preheat an oven to 400 F.
- Make the glaze. Combine the butter, maple syrup, dijon, and herbs in a small saucepan. Simmer over medium-low heat until the mixture is thick enough to coat the back of a spoon, about 10 minutes. Remove from the heat and add the bourbon and stir well. Set aside to cool.
- Prep the turkey for roasting. Remove the turkey from the fridge an hour before you plan to cook it. Add the onions, carrots, herbs, and garlic to the bottom of a roasting pan and pour in the wine and turkey stock. Place the turkey, breast side up, in the roasting pan on top of the veggies. Transfer the roasting pan to the oven.
- Roast and baste the turkey. Let the turkey roast for 45 minutes. Then, baste the turkey liberally every 10-15 minutes with the maple-bourbon butter, until the internal temperature in the thickest part of the turkey leg reaches 160 F, about 80-90 minutes total cooking time. If parts of the turkey start to get too dark, tent those areas with foil. Remove the turkey from the oven and carefully transfer just the turkey to a large cutting board and loosely tent it with foil. Let the turkey rest for 30 minutes before carving.
- You can discard the vegetables in the roasting pan and use the drippings to make my foolproof gravy.
Rate & Review This Recipe
This was my 3rd year making it for Thanksgiving and 2nd year for Friendsgivings. I will never cook turkey another way. My 12lb bird from start to finish including rest time only took 2hrs and 22 minutes. And the flavor, WOW!!!. You can pretty much put that glaze on anything.