

Classic Pot Roast
This Classic Pot Roast recipe is perfection! Melt in your mouth tender, full of rich beefy flavor, and all cooked in one pot. This recipe couldn’t be simpler to throw together, even on a busy weeknight.
This Classic Pot Roast recipe is great for beginners and delivers a perfect dinner every time! Chuck roasts are inexpensive cuts of beef that cook in the oven at a low temperature for a few hours. Add in a handful of veggies, rich broth, and some savory herbs for the perfect cozy dinner.
This has all the nostalgia of your mom’s pot roast recipe, but with a couple of flavorful twists! I’ve also got instructions for the Instant Pot & Slow Cooker!
The Best Classic Pot Roast Recipe
I grew up eating my Mom’s pot roast and this recipe comes straight from memory, with a couple of twists for extra flavor. There is truly nothing more classic than a pot roast dinner!
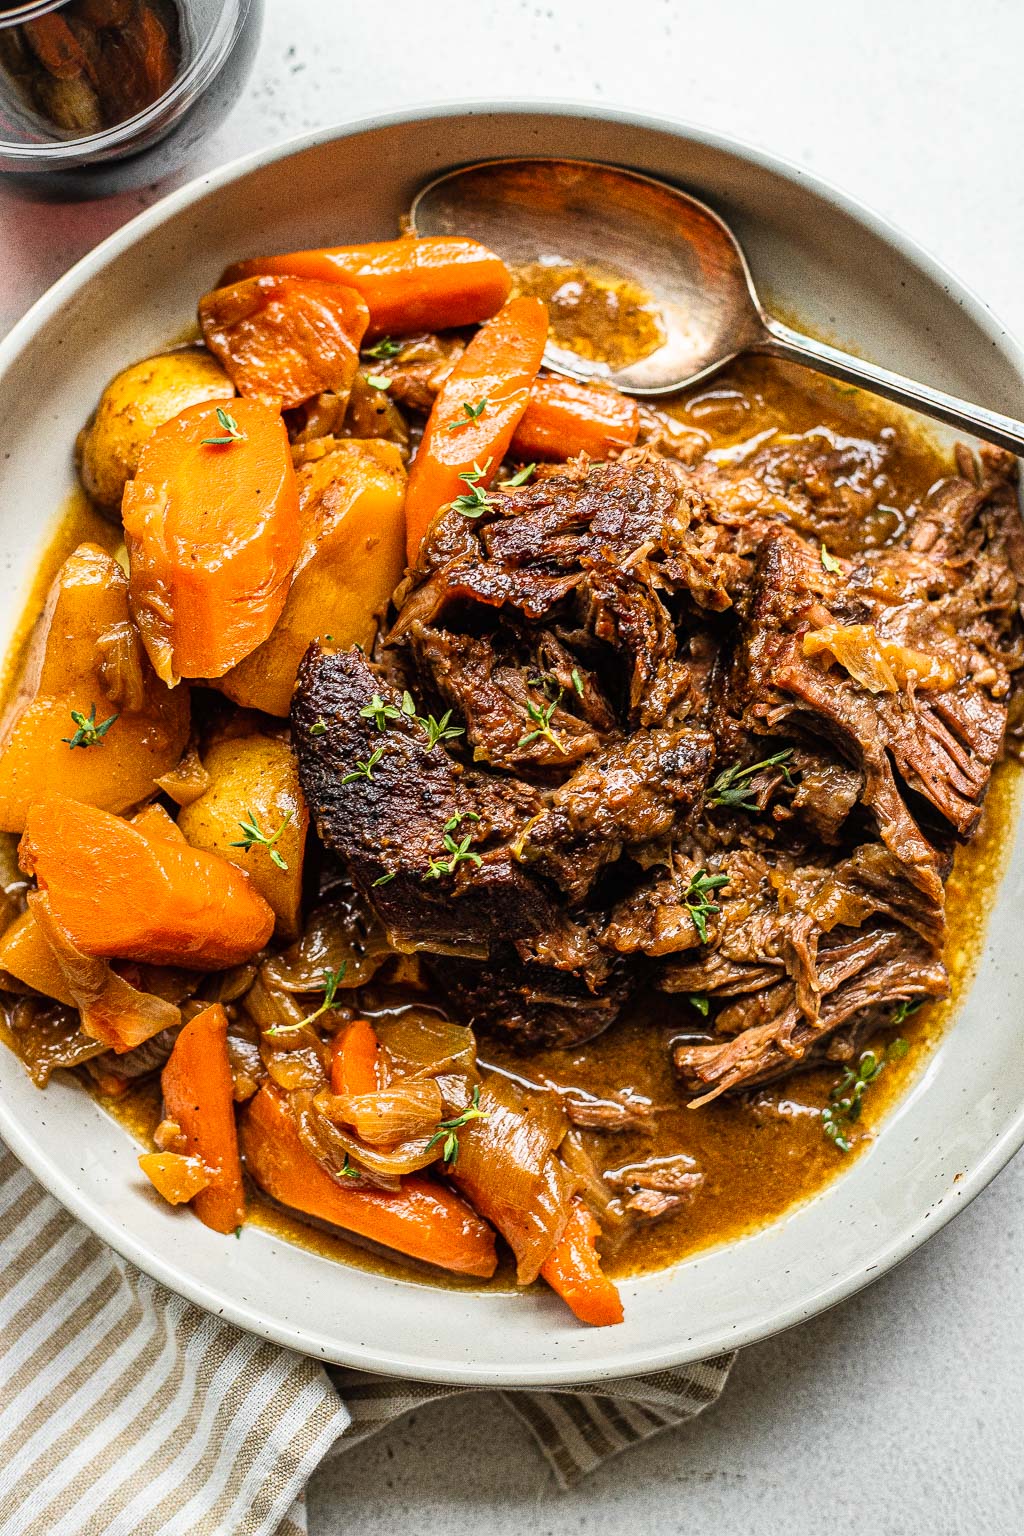
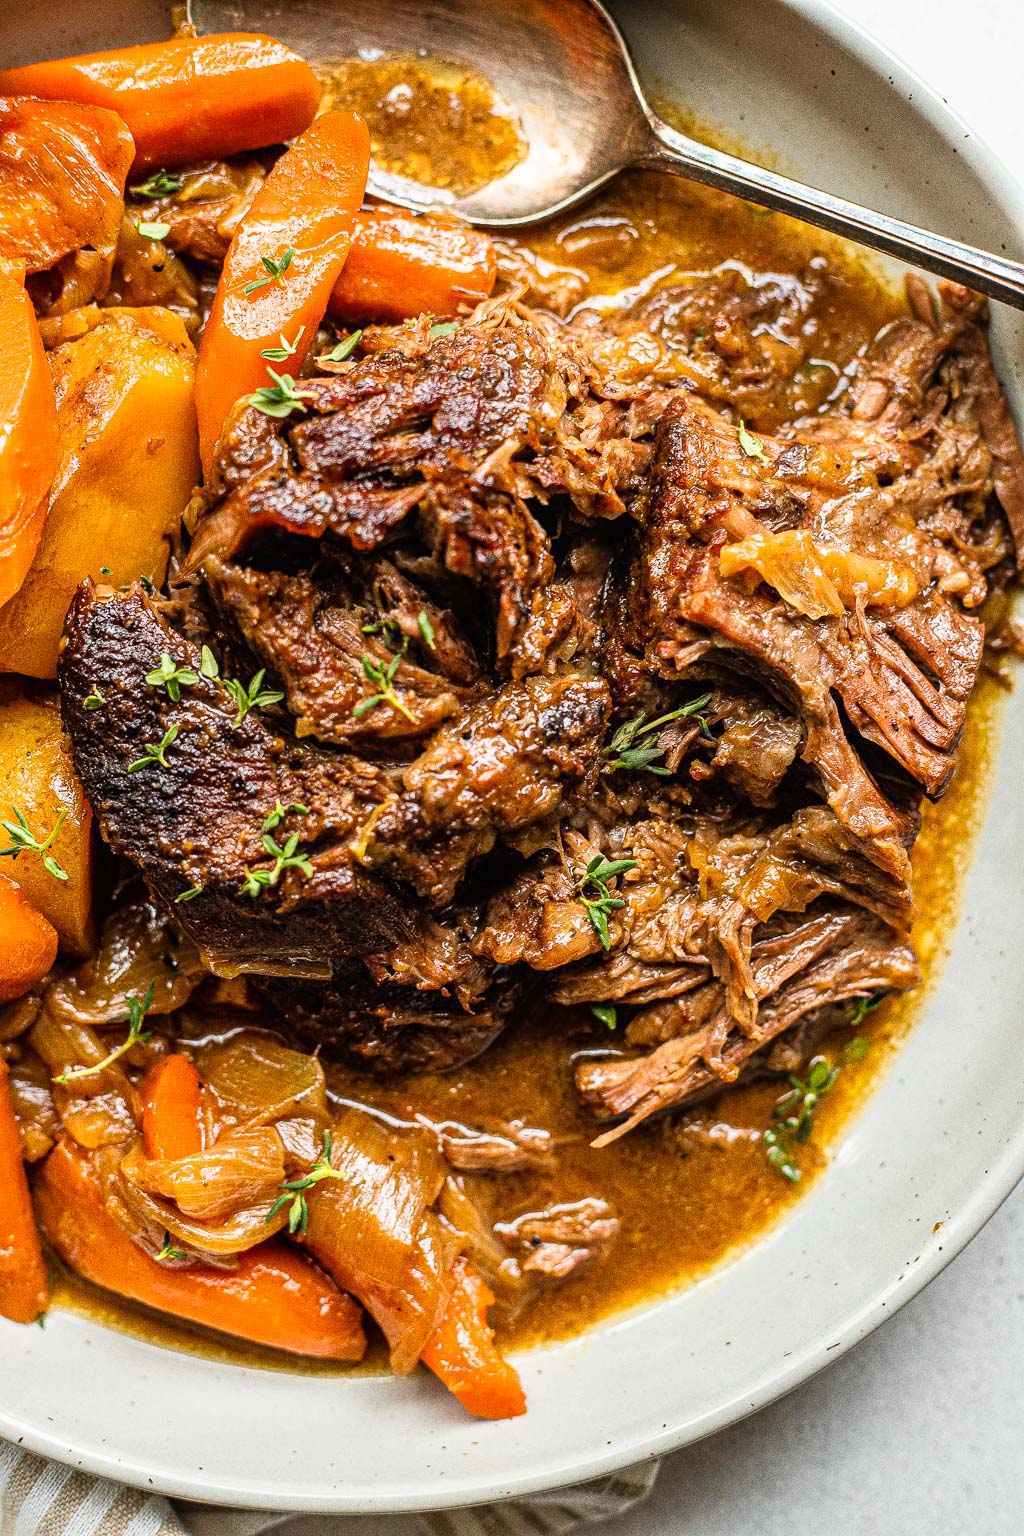
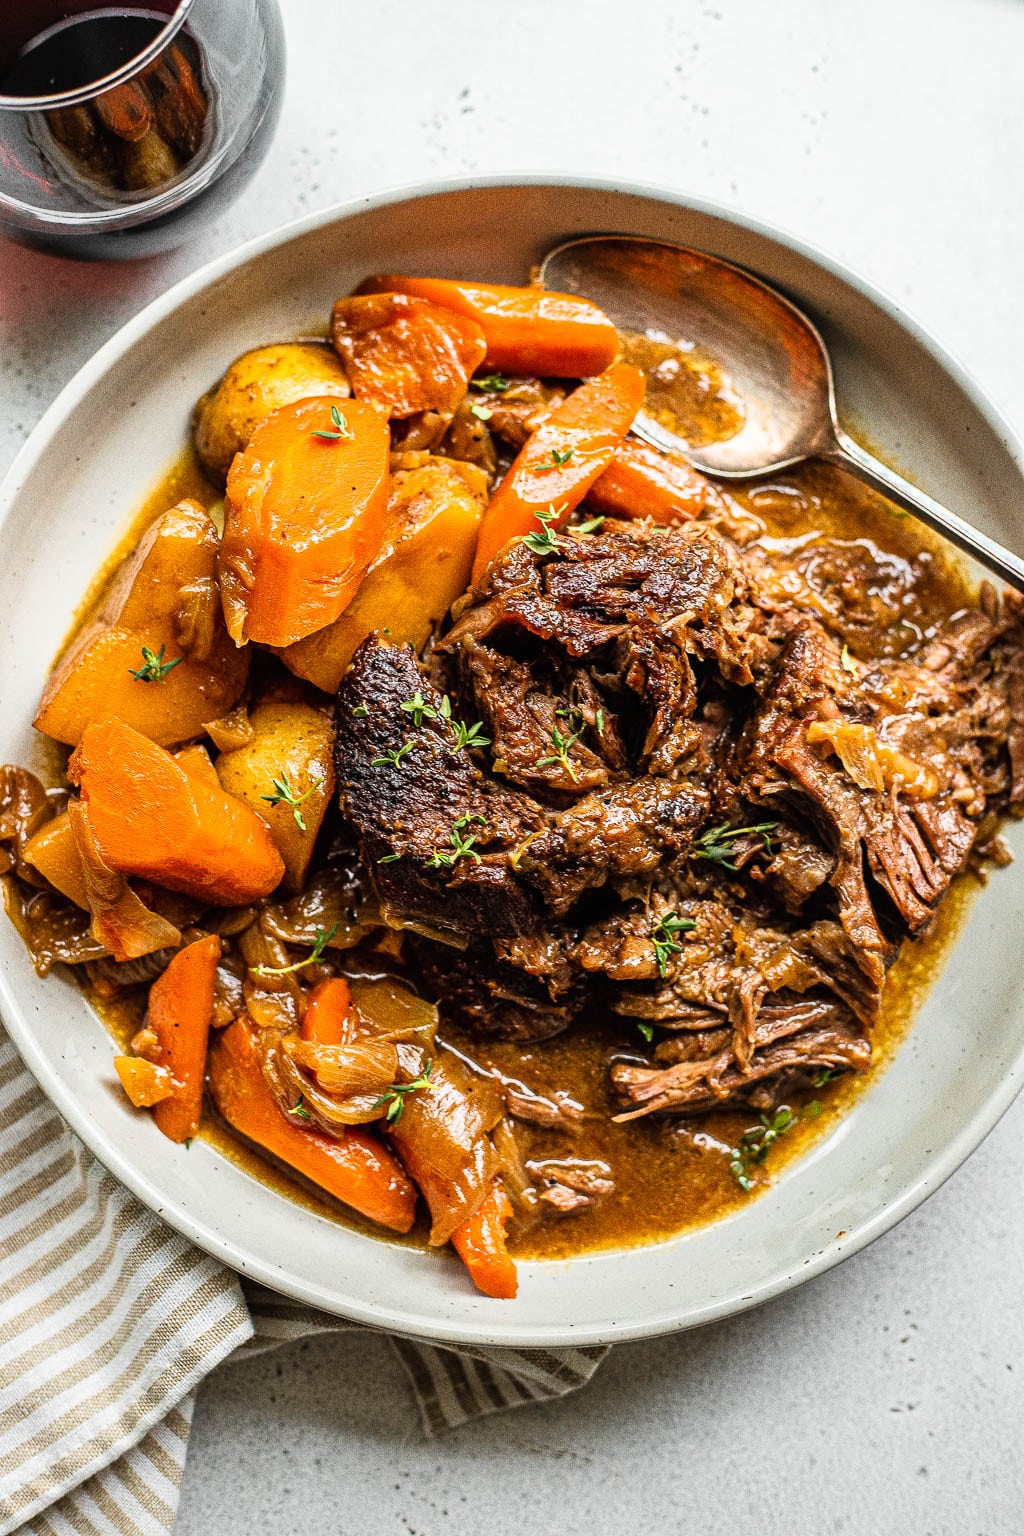
In this recipe, a well-marbled chuck roast is seasoned and seared until brown on all sides. Then, it goes into a dutch oven (or slow cooker!) with a flavorful broth, veggies, and some fresh herbs. Baked until fall apart tender, this recipe is very simple and hands-off!
So what makes this Classic Pot Roast recipe the best? The beef is flavorful and ultra tender with the perfect ratio of beef to vegetables. Our broth gets a little flavor boost from a packet of onion soup mix and red wine which melds into a flavorful sauce without being overly salty.
Onion soup mix was a staple in my mom’s cooking! Everything from meat loaf to burgers and sometimes meatballs got the soup mix treatment and it was SO good.
If you’re looking for more cozy braised dishes, check out my Red Wine Braised Beef or Apple Cider Braised Pork Shoulder!
What is Pot Roast?
A pot roast is a beef roast that generally starts with a tougher cut of beef. Cooking at a low temperature for a long time breaks down the tough connective tissues resulting in deliciously tender beef with a flavorful gravy.
The meat is seared, surrounded by carrots, onions, and a savory combination of herbs and spices and baked or oven-roasted until melt in your mouth tender. It’s definitely a bit of a retro recipe with roots in midwestern cooking. This Classic Pot Roast recipe has all the classic flavors, made even better!
Why You’ll Love this Recipe
Easy – This is not an involved recipe! A bit of chopping, mixing, simmering, and then the oven does most of the work. It’s a bit of up front work while being mostly hands-off leaving you free to work on other things!
Budget friendly – Beef chuck roast is an affordable cut of meat that can easily feed a crowd! This dinner feels impressive while still being low effort and low cost.
One Pot – I love an easy dinner that all comes together in one pot! All the searing, sautéing, and braising is one in one dutch oven or braiser that goes straight from stovetop to oven. No muss, no fuss!
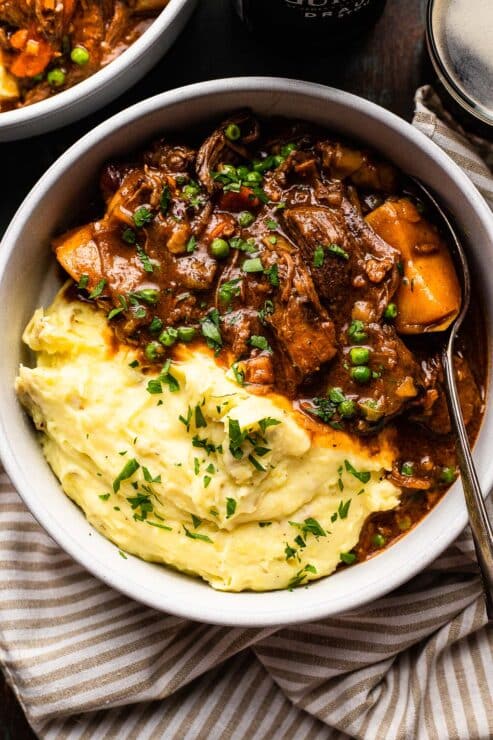
The Coziest Dinner – There’s just something about braising when the weather is chilly and looking forward to a warm stew-like dinner. This is honestly my favorite dinner to enjoy this time of year. Just load me up with all the Classic Pot Roast over mashed potatoes and I’m one happy gal.
How to Make Classic Pot Roast
This is one of those recipes that comes together so easily but feels so impressive! You’ll be shocked at how low-effort it is. As with all braising, I recommend investing in a dutch oven. It’s a work horse in my kitchen and a must for every cook! For this Classic Pot Roast, I recommend using a 6-7 qt dutch oven.
Tools Needed
Ingredients and Substitutions
- Beef Chuck. In my opinion, beef chuck roast is the best meat for pot roast, but you can also use other cuts like brisket or top round with lots of connective tissue. Tough cuts yield the best results when braising!
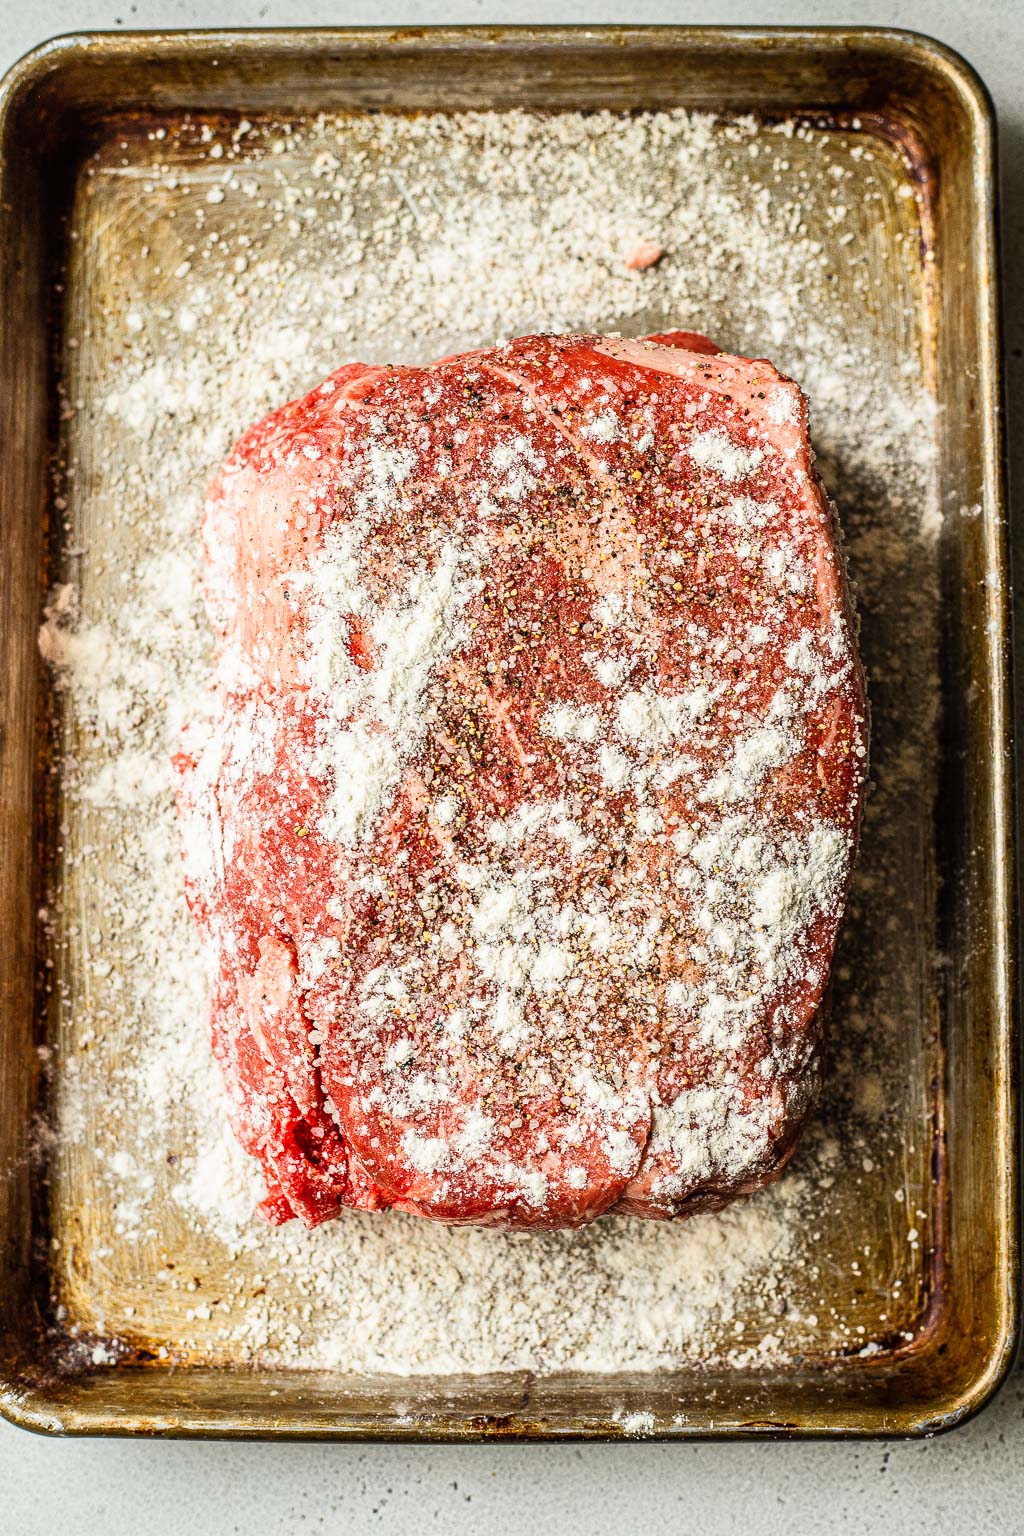
- Flour. A bit of flour on the outside of the chuck roast helps it brown better which in turn creates more flavor!
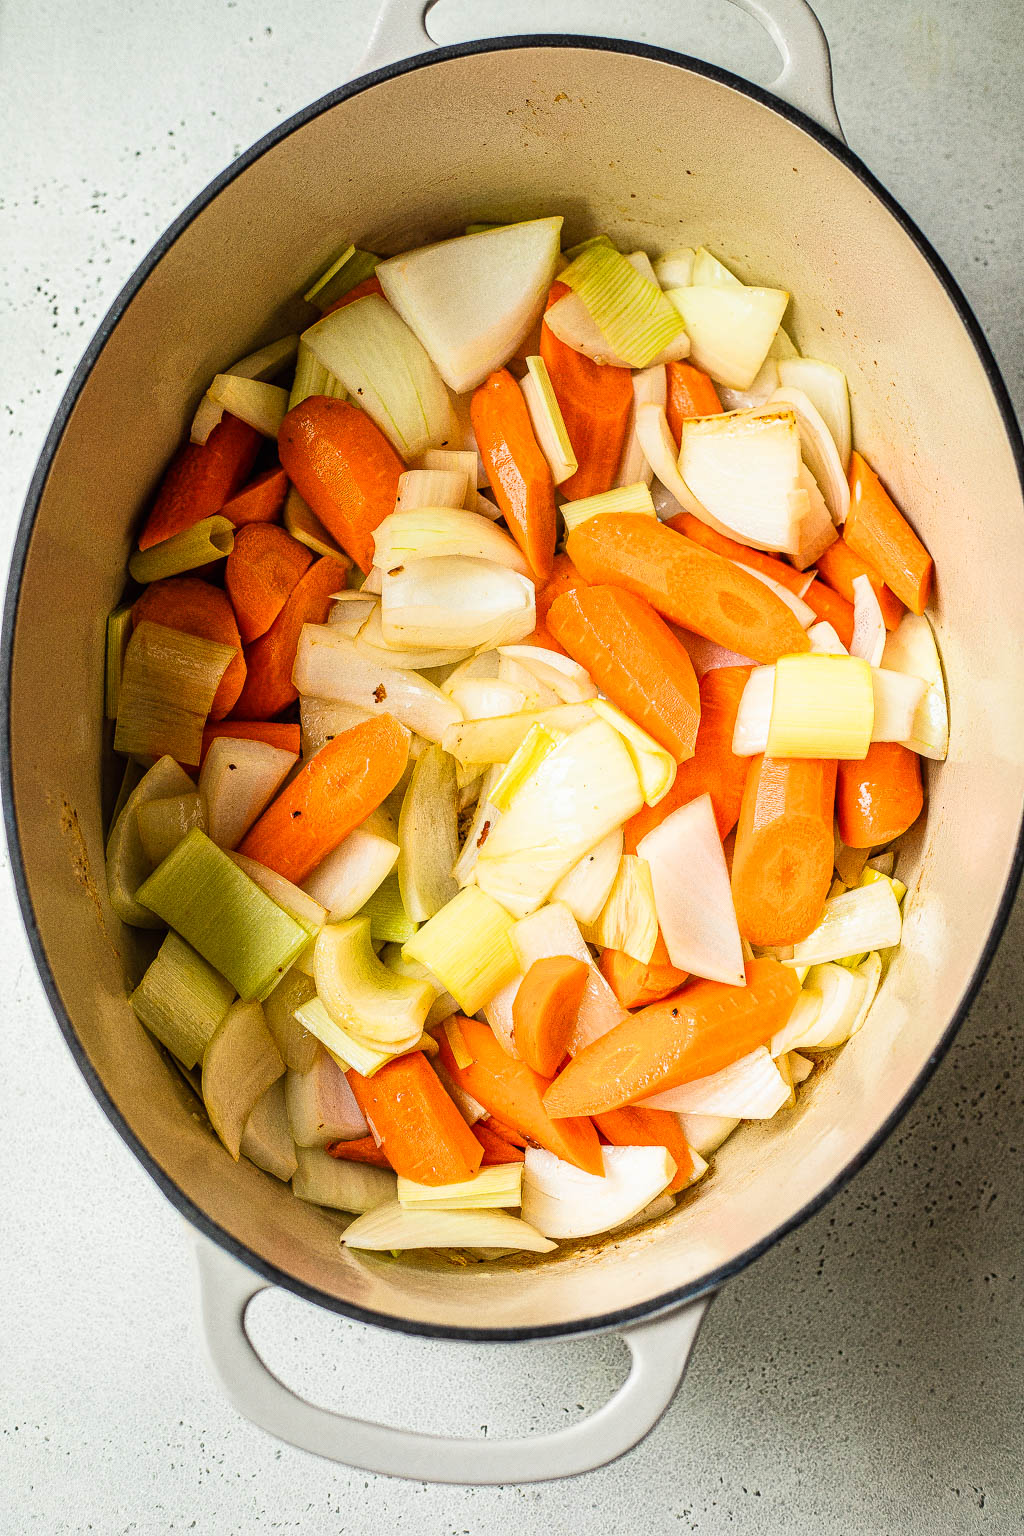
- Veggies. I use onion, carrot, leek, and baby potatoes in this Classic Pot Roast recipe. You could also add celery, turnips, or other root vegetables. This recipe is also packed with garlic!
- Onion soup mix. I love using a couple packets of Lipton Onion Soup mix to bolster the flavor of the braising liquid! Look for a gluten-free version to make this pot roast gluten free.
- Beef broth. Homemade is always best, but you can use your favorite store-bought brand.
- Red wine. A bold red wine adds tons of flavor to the pot roast. All the alcohol cooks off, so you don’t have to worry about residual alcohol. If concerned, you can omit the wine and just use extra beef broth.
- Flavor boosters. In addition to onion soup mix, I also add dijon and Worcestershire to the braising liquid for extra flavor!
- Thyme. A couple of sprigs of thyme add tons of flavor.
The Process
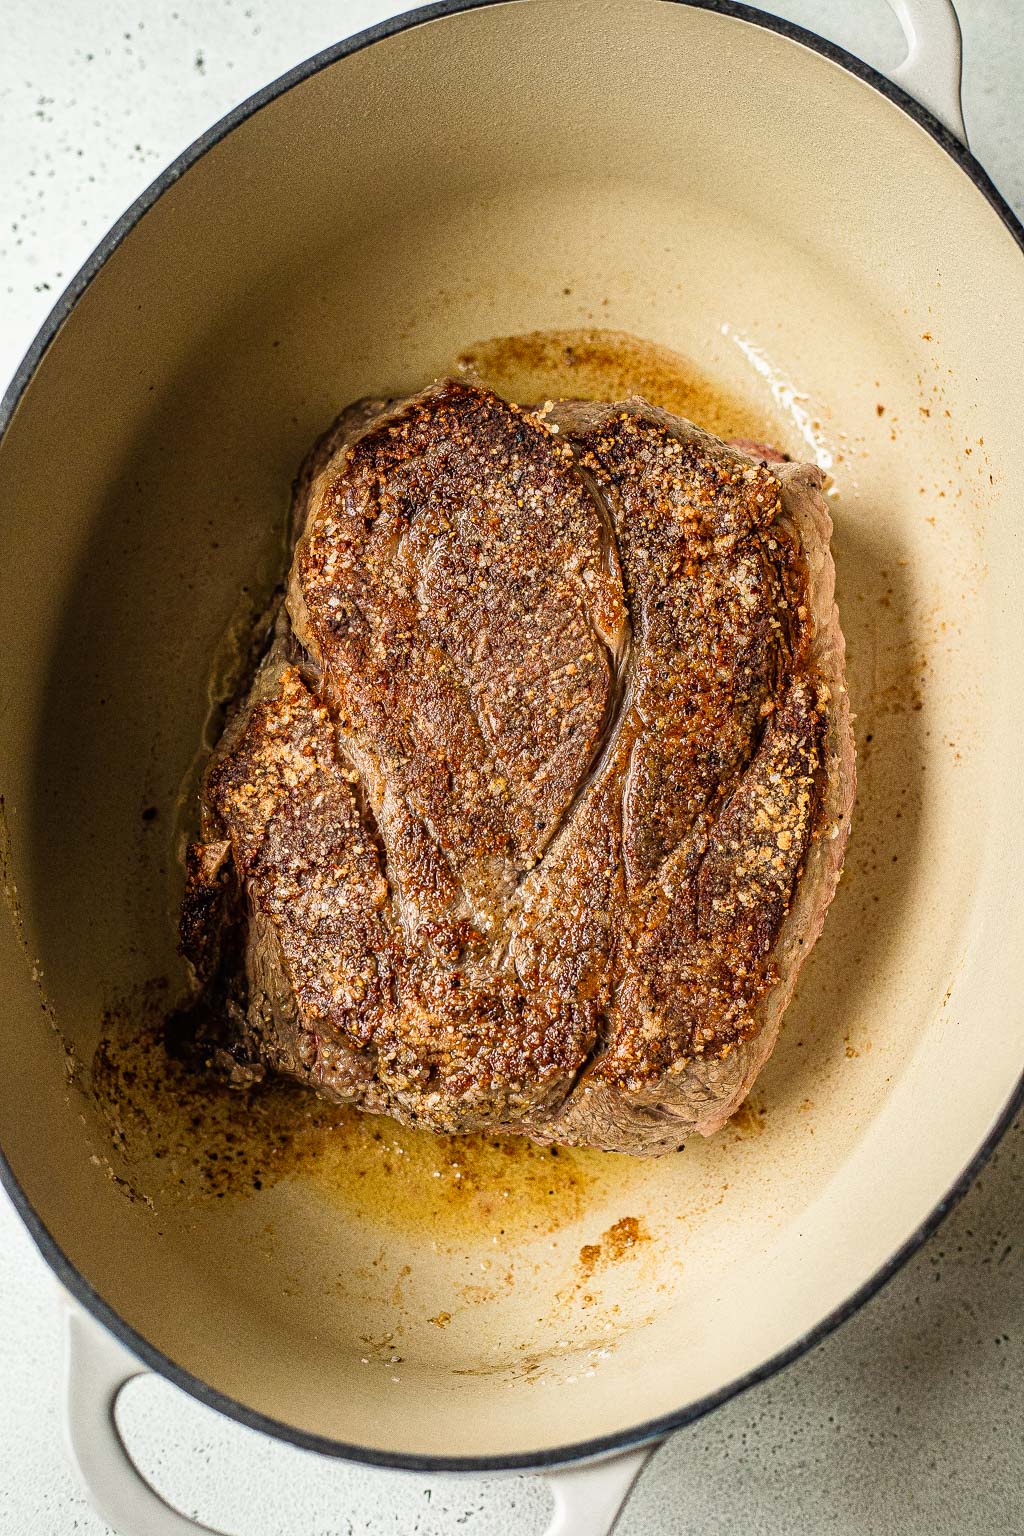
- Prep the beef. Take the chuck roast out of the fridge 30 minutes before cooking to bring it to room temperature. This helps the meat brown more evenly. Pat the meat dry with a paper towel and season liberally with salt and pepper all over.
- Sear the beef. Coat the seasoned beef chuck with a bit of flour all over. Heat 2 tablespoons of neutral oil in a large dutch oven (6-7 qt) over medium-high heat. Cook the roast for 3-4 minutes per side until everything is nicely browned (don’t forget about the ends & narrow sides!).
- Mix the braising liquid. In a large measuring cup or bowl, whisk together the soup mix, wine, beef broth, dijon, and Worcestershire sauce until smooth. Set aside.
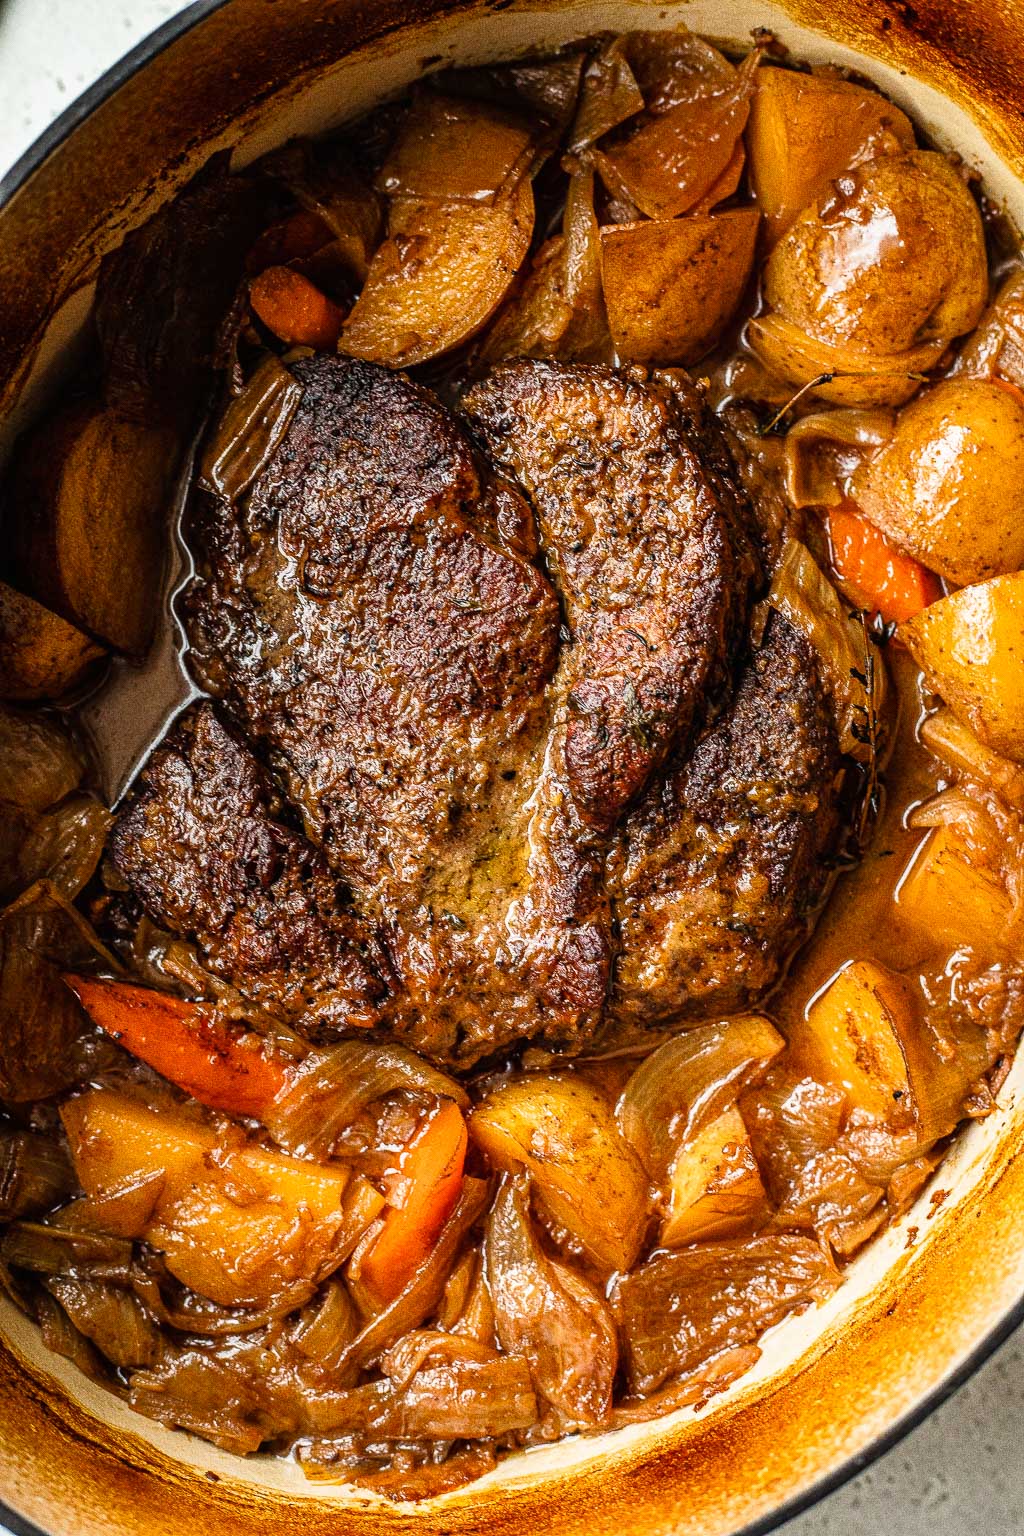
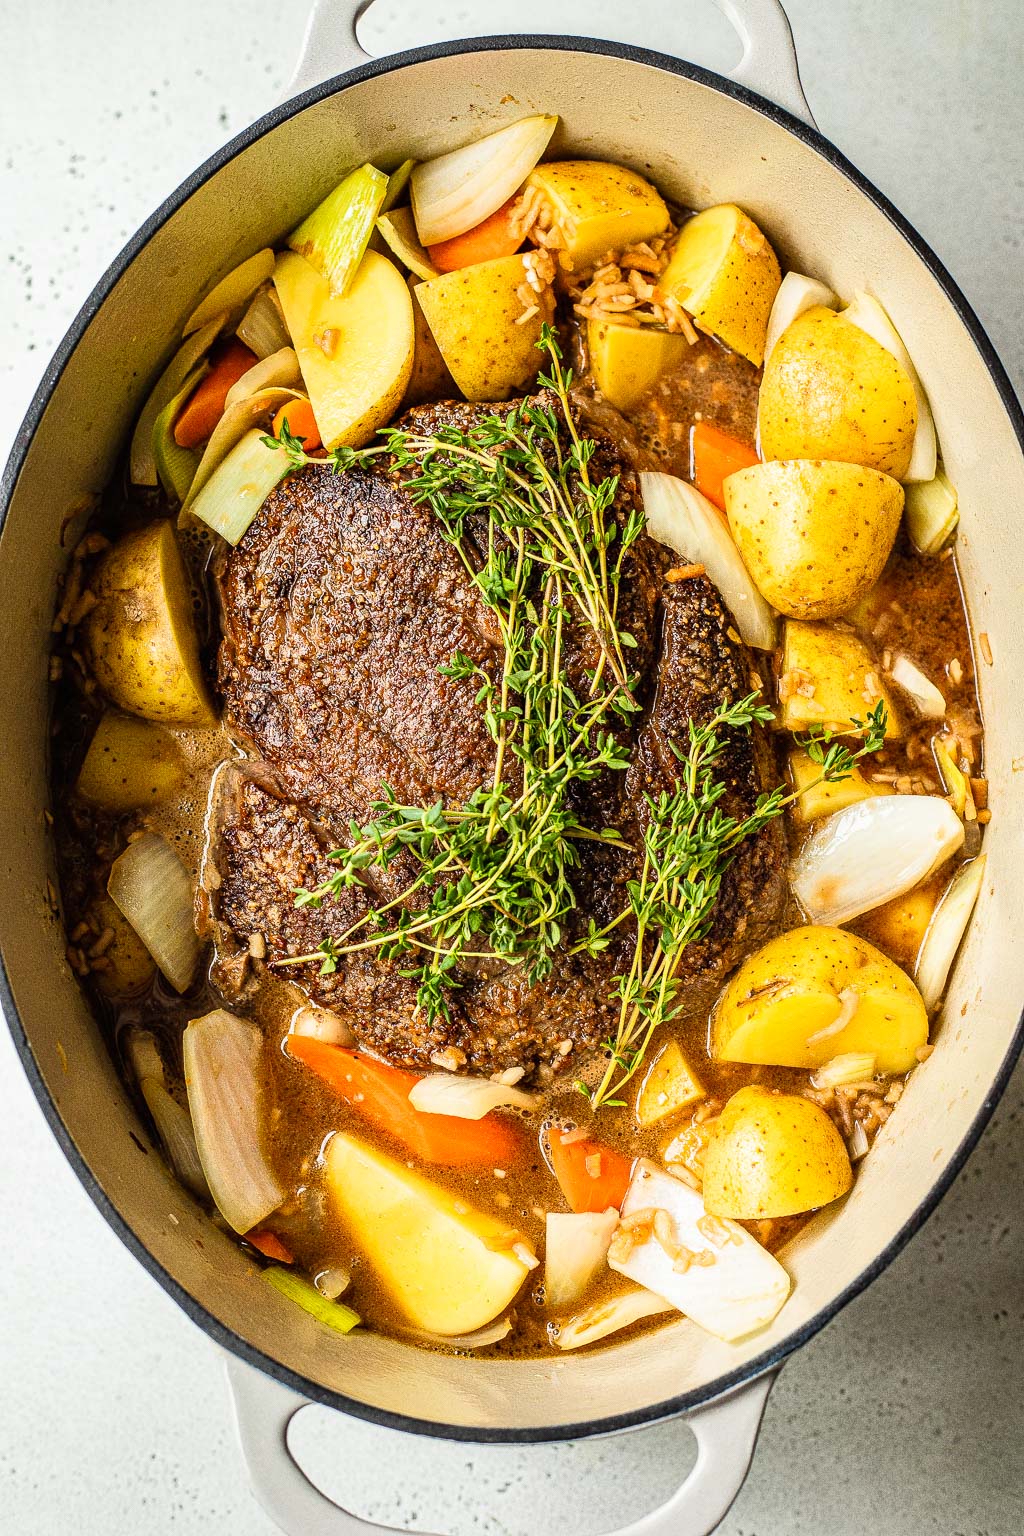
- Assemble the pot roast pot. Remove the browned beef from the pot and arrange the veggies in the bottom of the pot. Scoot the veggies to the edges a bit so that the beef can nestle in the middle. Pour in the braising liquid and add the thyme sprigs. Cover and transfer to the oven.
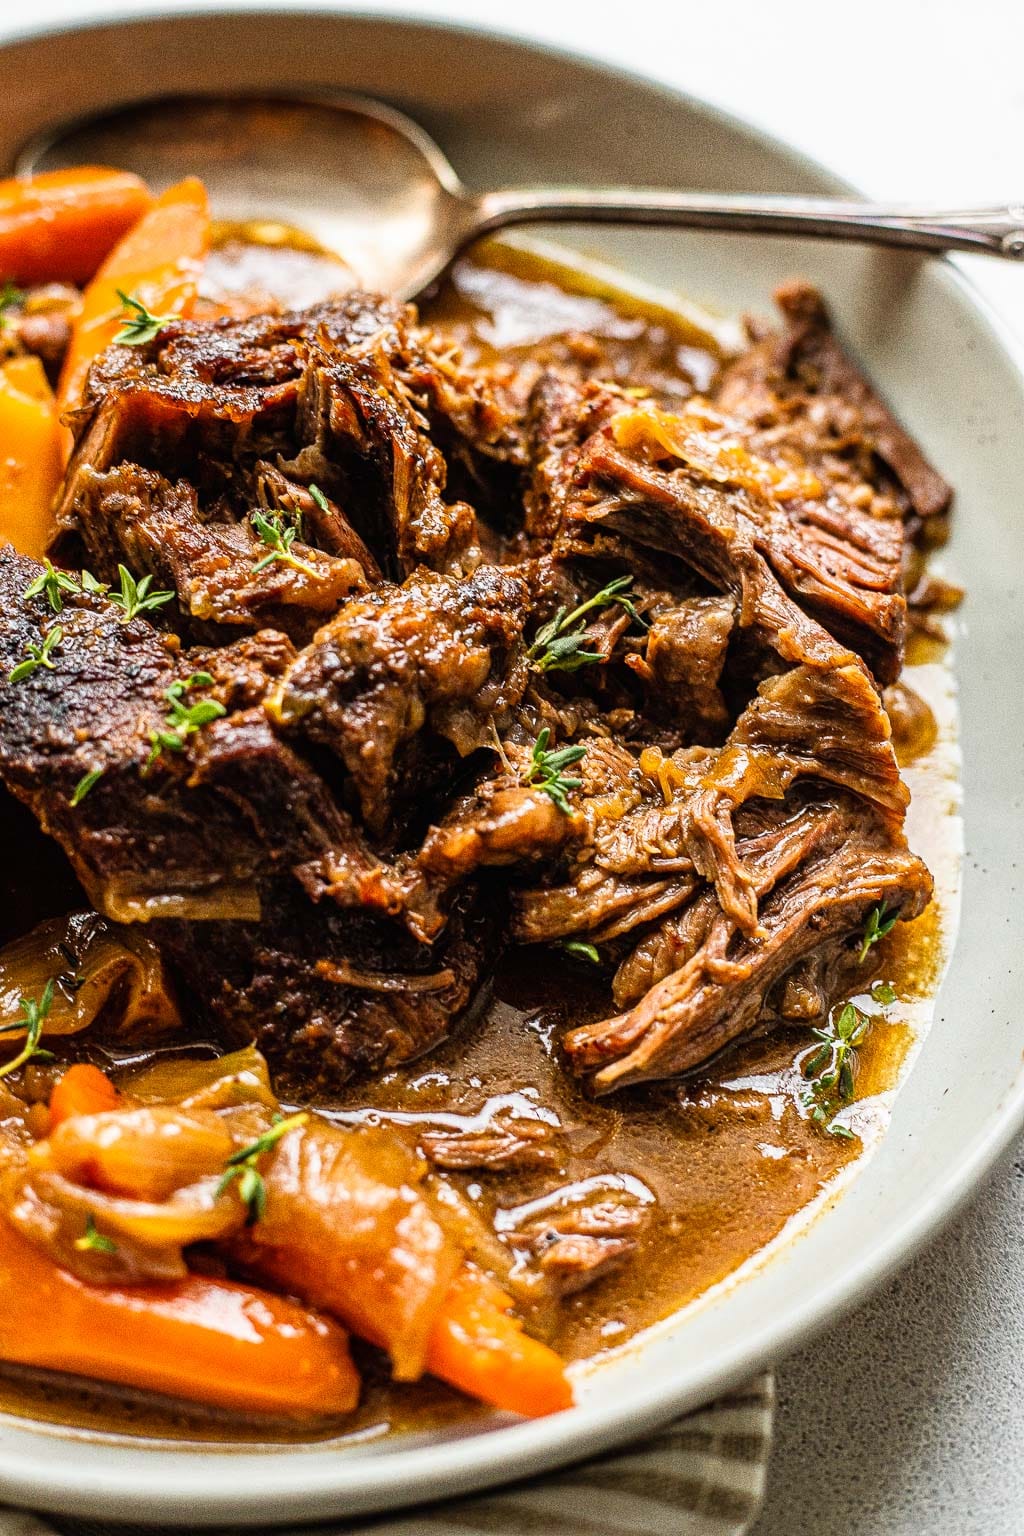
- Braise. Once assembled, transfer the pot roast to the oven to braise. Start checking the pot roast about the 3 hour mark. The pot roast is ready when it’s tender and easily shredded by a fork–if it’s still tough, it just needs a bit more time. Remove from the oven and rest covered for 15 minutes before serving.
- Make the gravy. This is an optional step. Remove the beef and vegetables from the pot and transfer to a serving plate. Whisk together 2 teaspoons of cornstarch with 1/4 cup of water, until smooth. Pour into the pot and bring the sauce to a simmer for 2-3 minutes while whisking, until thick. Pour over the pot roast and veggies, or serve the gravy on the side.
What is Braising?
Braising is a combination cooking technique that features both wet and dry heat. First, you sear the chuck roast in the pan for flavor and color and then you add liquid to the pot and transfer the covered pot to the oven. In the oven, the beef cooks slowly at a lower temperature.
The resulting meat is exceedingly tender. Braising is particularly effective for tough cuts of meat (brisket, chuck, pork shoulder, etc). Cooking tough meats low and slow in liquid allows the muscle tissue and collagen to slowly break down. Any liquid can be used to braise, but this flavorful beef broth mix really adds that extra depth of flavor and makes this Classic Pot Roast recipe truly the best!
Alternate Cooking Methods for Classic Pot Roast
I love taking my time braising in the oven, but that’s not always feasible with time constraints. Here are some other methods for cooking up this Classic Pot Roast.
Slow Cooker – Use another pan or pot to sear the beef before adding it to the slow cooker. Seriously, don’t skip this step because it adds SO much flavor! Once the chuck roast is seared, add it to the slow cooker and pour the braising liquid over the top. Add the veggies and fresh herbs. Cover and cook on high for 4-5 hours, or low for 7-8 hours.
Stovetop – Instead of transferring the Dutch oven pot roast to the oven, leave it to braise over medium-low heat on the stovetop. It will take a similar amount of time, but leaves your oven free if you need to do any other cooking!
Instant Pot or Pressure Cooker – Follow the recipe as written, using the saute function on your instant pot. Let the pan get nice and hot before searing the beef using the ‘high’ setting for saute. Add the broth mixture, veggies, and herbs to the pot. Set the Instant Pot to ‘pressure cook’ for 65 minutes, with natural release for 10 minutes, then switch to manual release. This is my least favorite method, as the pressure cooking sacrifices some flavor.
What to Serve with Classic Pot Roast
If you’re throwing a dinner party or just want a nice dinner to enjoy, here are some of my favorite dishes to serve with Classic Pot Roast.
Leafy salad – I love starting a meal with a big leafy salad! My recipe for KALE CAESAR SALAD is one of my favorite salads ever and pairs so well with any braised meat. You’re going to love the homemade caesar dressing!
Mashed potatoes – Who doesn’t love piling tender beef and juices on a bed of mashed potatoes? If you want a classic version, try my CREME FRAICHE MASHED POTATOES. If you want to try something new, my CARAMELIZED ONION AND BACON MASHED POTATOES are a show stopper!
Dinner Rolls – I don’t know about you, but I’m a sucker for warm dinner rolls! I love sopping up any extra juices with a warm piece of bread. Try my foolproof FLUFFY DINNER ROLLS!
Storing, Freezing, and Reheating Classic Pot Roast
In the event that you have leftovers, pot roast is easy to store and freeze!
To store Classic Pot Roast: Let the beef and liquid cool to room temperature and store in an airtight container for 4-6 days in the fridge.
Freezing pot roast: You can very easily freeze pot roast! Let the beef and liquid cool to room temperature and then store in a freezer-safe ziplock bag. Try to press most of the air out of the bag while sealing, this helps prevent freezer burn. Label and freeze for up to 3 months. Defrost overnight in the fridge.
Reheating: Classic Pot Roast is best reheated in a skillet or dutch oven. Add the beef and liquid to a dutch oven or skillet, adding a little extra broth or water as needed. Cover and simmer on low until the beef is tender and warmed through.
Classic Pot Roast FAQs
What’s the best cut of meat for pot roast?
Beef chuck roast, for sure! Choose a large piece that has good marbling and a nice thickness of about 2 1/2-3″. I usually opt for at least “choice” quality beef when making pot roast.
Is pot roast gluten-free?
For the most part, yes! If you use Lipton’s onion soup mix, know that it does contain soy sauce. If you’re concerned, look for a gluten-free onion soup mix. I also coat the roast in flour to help it brown more when seared, but you can skip that step.
Should I flip my pot roast while cooking?
You can, but it’s not necessary! I find that the amount of liquid is perfect and keeps the pot roast moist and tender. If you’re worried about the top drying out, you can flip the roast halfway through the cooking process.
How do you make pot roast tender?
Whether you cook your pot roast using a stovetop, oven, slow cooker, or pressure cooker method, you’ll always get the most tender and flavorful results if you use low temperatures over a long period of time.
Next time you’re in the mood for a cozy & comforting meal, try this Classic Pot Roast recipe! It’s one of our year-round favorites, and I know you will love it just as much as we do! If you do give it a try, be sure to let me know! Leave a comment with a star rating below. You can also snap a photo & tag @JENNYGOYCOCHEA on Instagram. I LOVE hearing about & seeing your SMF creations!
More Cozy One-Pot Meals to Try Now
Beef Bourguignon
The Best Bolognese Sauce
Caramelized Shallot Pasta
Tomato Tortellini Soup
This post contains affiliate links from which I receive a small commission at no additional cost to you. Affiliate links allow me to keep providing great recipes for free and I never recommend products that I don’t love and personally own.

Classic Pot Roast
Ingredients
- 3.5 – 4 lb beef chuck roast
- 2 tablespoons flour
- 2 tablespoons olive oil
- 1 leek (white and light green parts only), chopped
- 1 large yellow onion, chopped
- 4-5 large carrots, peeled and chopped
- 1 1/2 lbs baby yellow potatoes
- 6 garlic cloves, sliced
- 2 1/2 cups beef stock or broth
- 3/4 cup bold red wine
- 2 tablespoons dijon mustard
- 2 (two) 1-ounce packets onion soup mix
- 2 tablespoons Worcestershire sauce
- 3-4 thyme sprigs
- 2 bay leaves
- slurry, optional (2 teaspoons cornstarch mixed with 1/4 cup water)
- kosher salt
- freshly cracked pepper
Instructions
- Prep: 20-30 minutes before you’d like to begin preparing your pot roast, transfer the beef chuck roast from the refrigerator to the kitchen counter, allow it to come to room temperature for even searing. Pat dry with a paper towel and season liberally all over with kosher salt and freshly cracked pepper.
- Preheat an oven to 350 F.
- Sear: Dust the roast all over with flour. Heat the oil in a large (6-7 qt dutch oven) over medium-high heat on the stove. Once the oil in the pot is hot, carefully add in the seasoned dredged roast. Cook 3-4 minutes per side, including the ends & narrow sides, until nicely browned. Transfer the browned chuck roast to a plate & set aside.
- Mix the braising liquid: In a large measuring cup whisk together the beef broth, wine, dijon, soup mix, and Worcestershire until smooth.
- Assemble: To the same pot used to brown the chuck roast, add in the baby potatoes, carrots, yellow onions, garlic, and leek. Use a wooden spoon to push the vegetables to the sides of the pot, then nestle the browned chuck roast in the center. Pour in the braising liquid (make sure to get all the dried spices in the bottom!) and bring to a simmer.
- Braise: Cover the Dutch oven & carefully transfer the pot roast to the preheated oven to braise for 3 – 3 1/2 hours, until the chuck roast is fork-tender. If the roast is still tough, it just needs more time. The meat should shred easily with a fork. Remove from the oven and leave covered for 20 minutes.
- Make the gravy: (Optional) Remove the roast and veggies from the pot and transfer to a serving plate. Place the Dutch oven back on the stovetop over medium heat. Mix together the cornstarch slurry and pour into the liquid that remains in the pot. Bring to a simmer for 2-3 minutes, while whisking, until thick. Pour over the roast and veggies or serve on the side.


Rate & Review This Recipe