
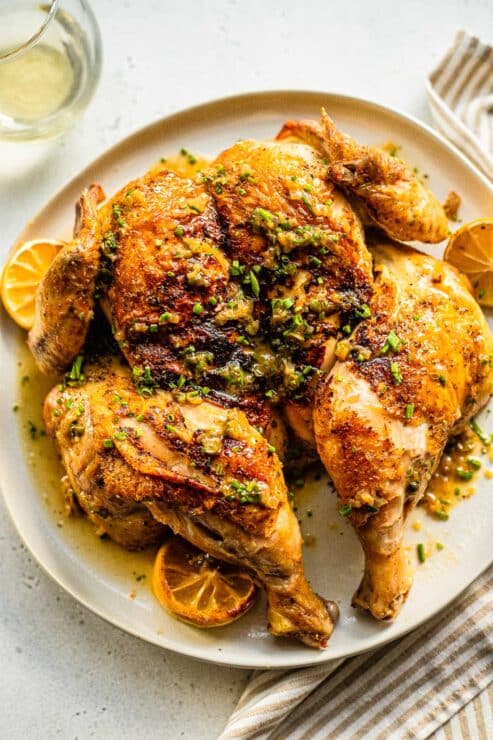
Dry Brined Spatchcock Turkey
Alright, y’all! This is THE post. We’re going to be talking all things Thanksgiving turkey 101 and this dry brined spatchcock turkey is a must for every table. Once you learn this technique, you are going to look like an absolute pro every Thanksgiving. Say goodbye to dry and flavorless birds, that all ends today!
Dry Brine vs. Wet Brine
A wet brine is a solution of water, salt, and a little sugar, along with some herbs and spices for flavor. You submerge your meat prior to cooking in the brining solution and through osmosis, the meat absorbs flavor and moisture. When you season a piece of meat you’re seasoning the outside and the inside doesn’t really absorb that flavor. However, with brining, you are flavoring the whole piece of meat inside and out. A wet brine is often great for lean meats that dry out during cooking as it adds extra moisture. I love brining chicken breasts and thick pork chops!
A dry brine is all of that (salt, sugar, herbs, spices), without the water. I love dry brine because there is no mess and fuss with trying to find a container large enough for the brine and meat. The salt in the dry brine pulls moisture from the meat, dissolves the salt and spices on the outside, and then re-absorbs that concentrated and flavorful liquid. Dry brining tenderizes the meat and gives you extra crispy skin. I honestly can’t think of an argument against dry brining!
What is Spatchcocking?
Spatchcocking is a method of preparing your poultry where you remove the backbone from the bird and break the ribs and breast bone so that it lays flat. This process is also referred to as “butterflying.” It may sound ominous, but there is honestly no other way that I prepare poultry anymore.
I especially love it for turkey because it speeds up the cooking process and I get to add the backbone to my turkey stock for gravy. The backbone adds so much flavor to the turkey stock!
Reasons to Spatchcock a Turkey
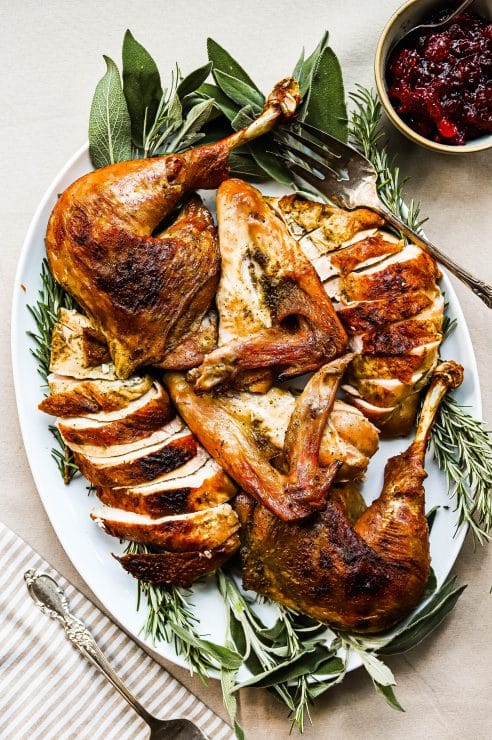
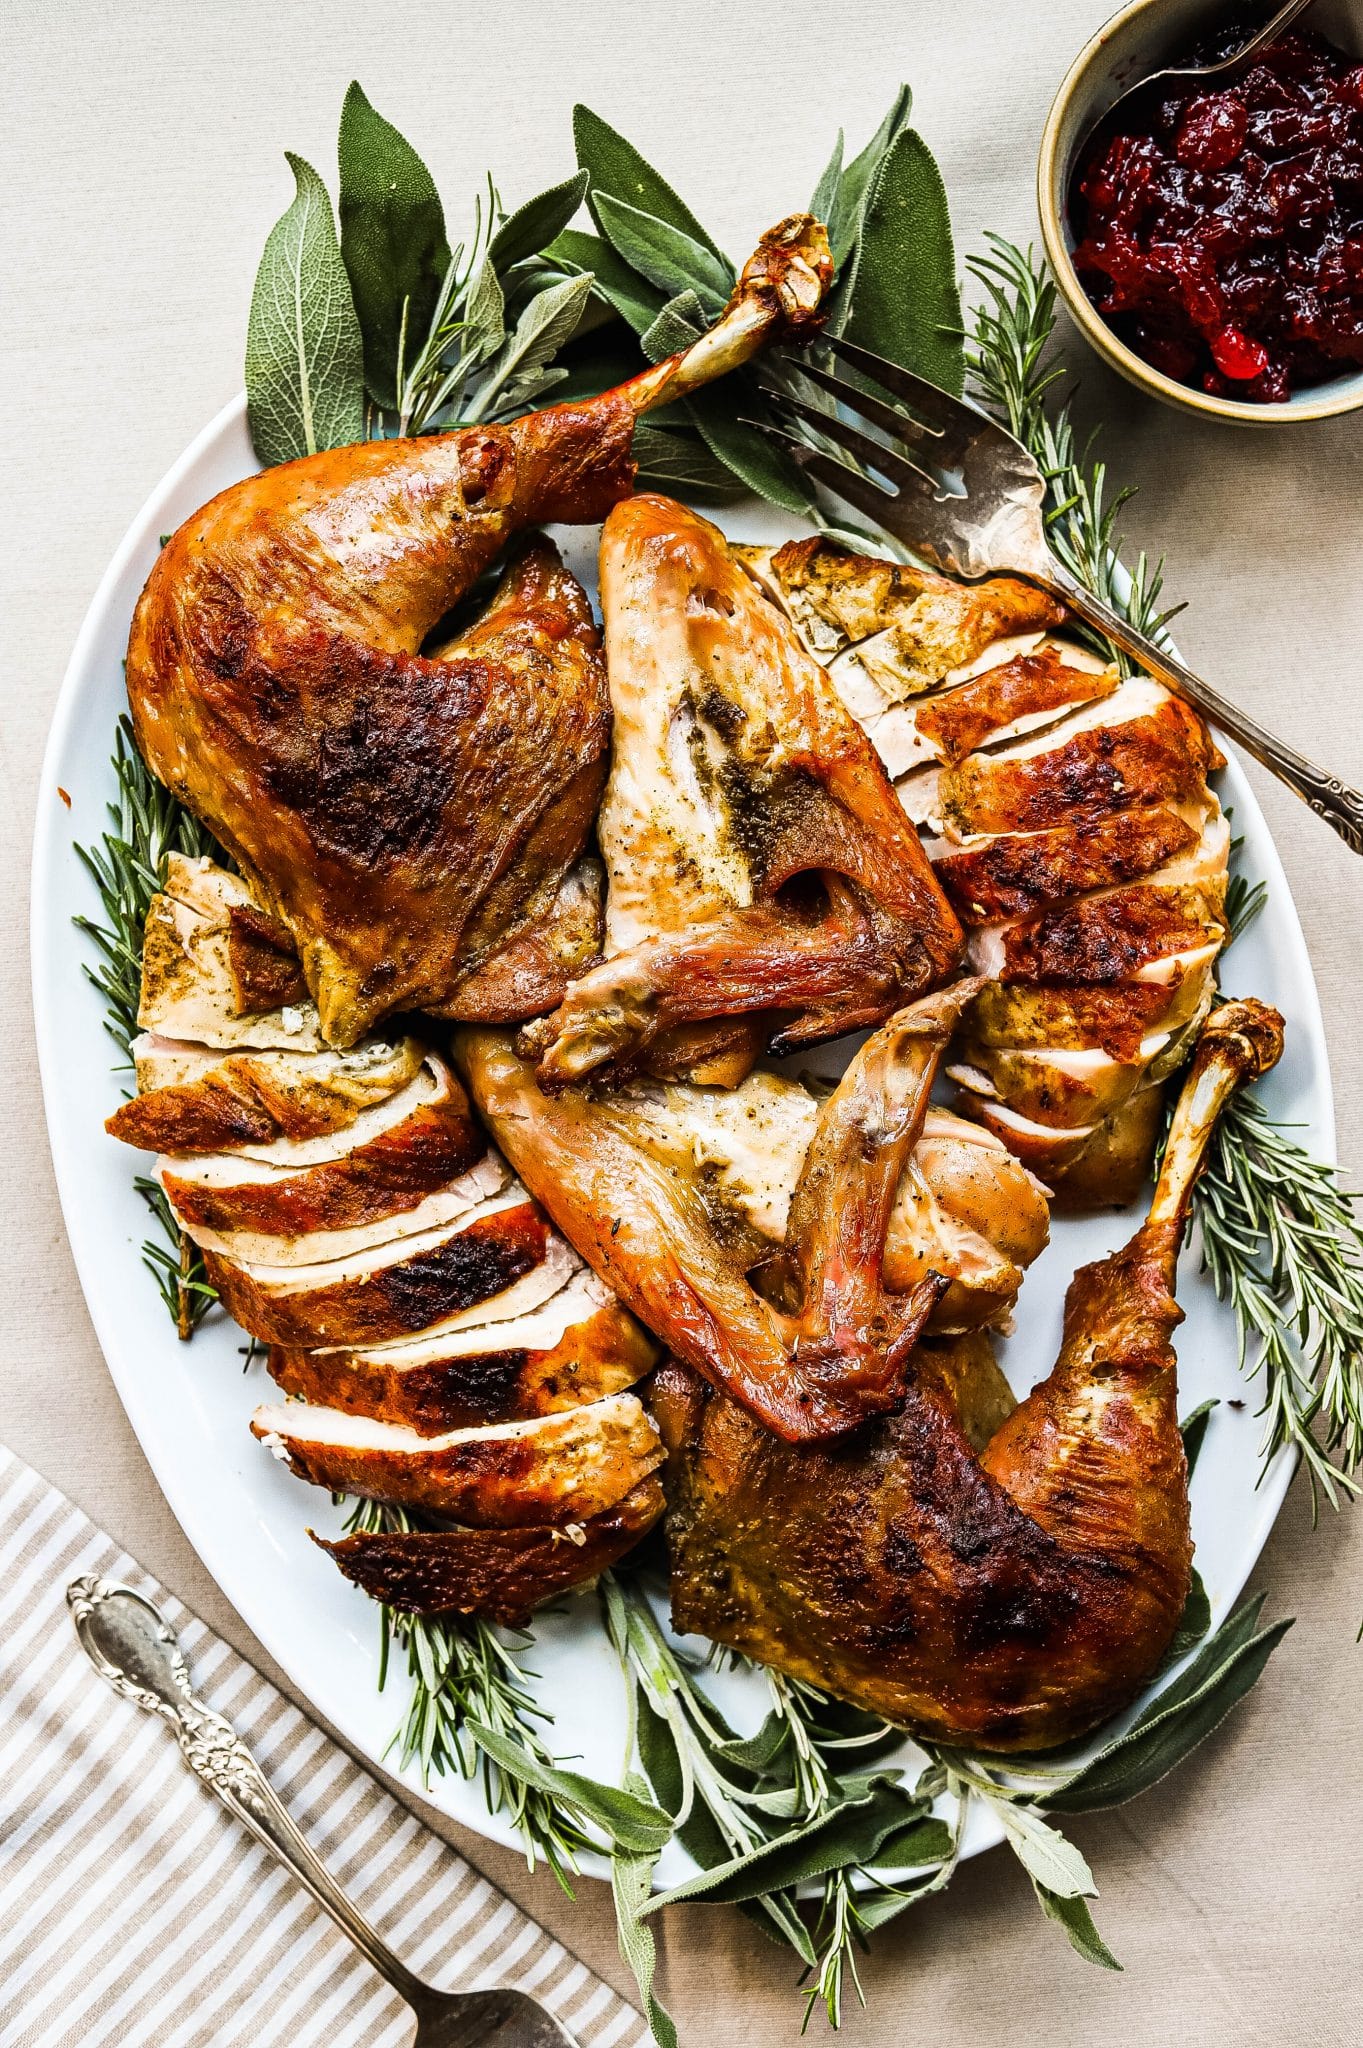
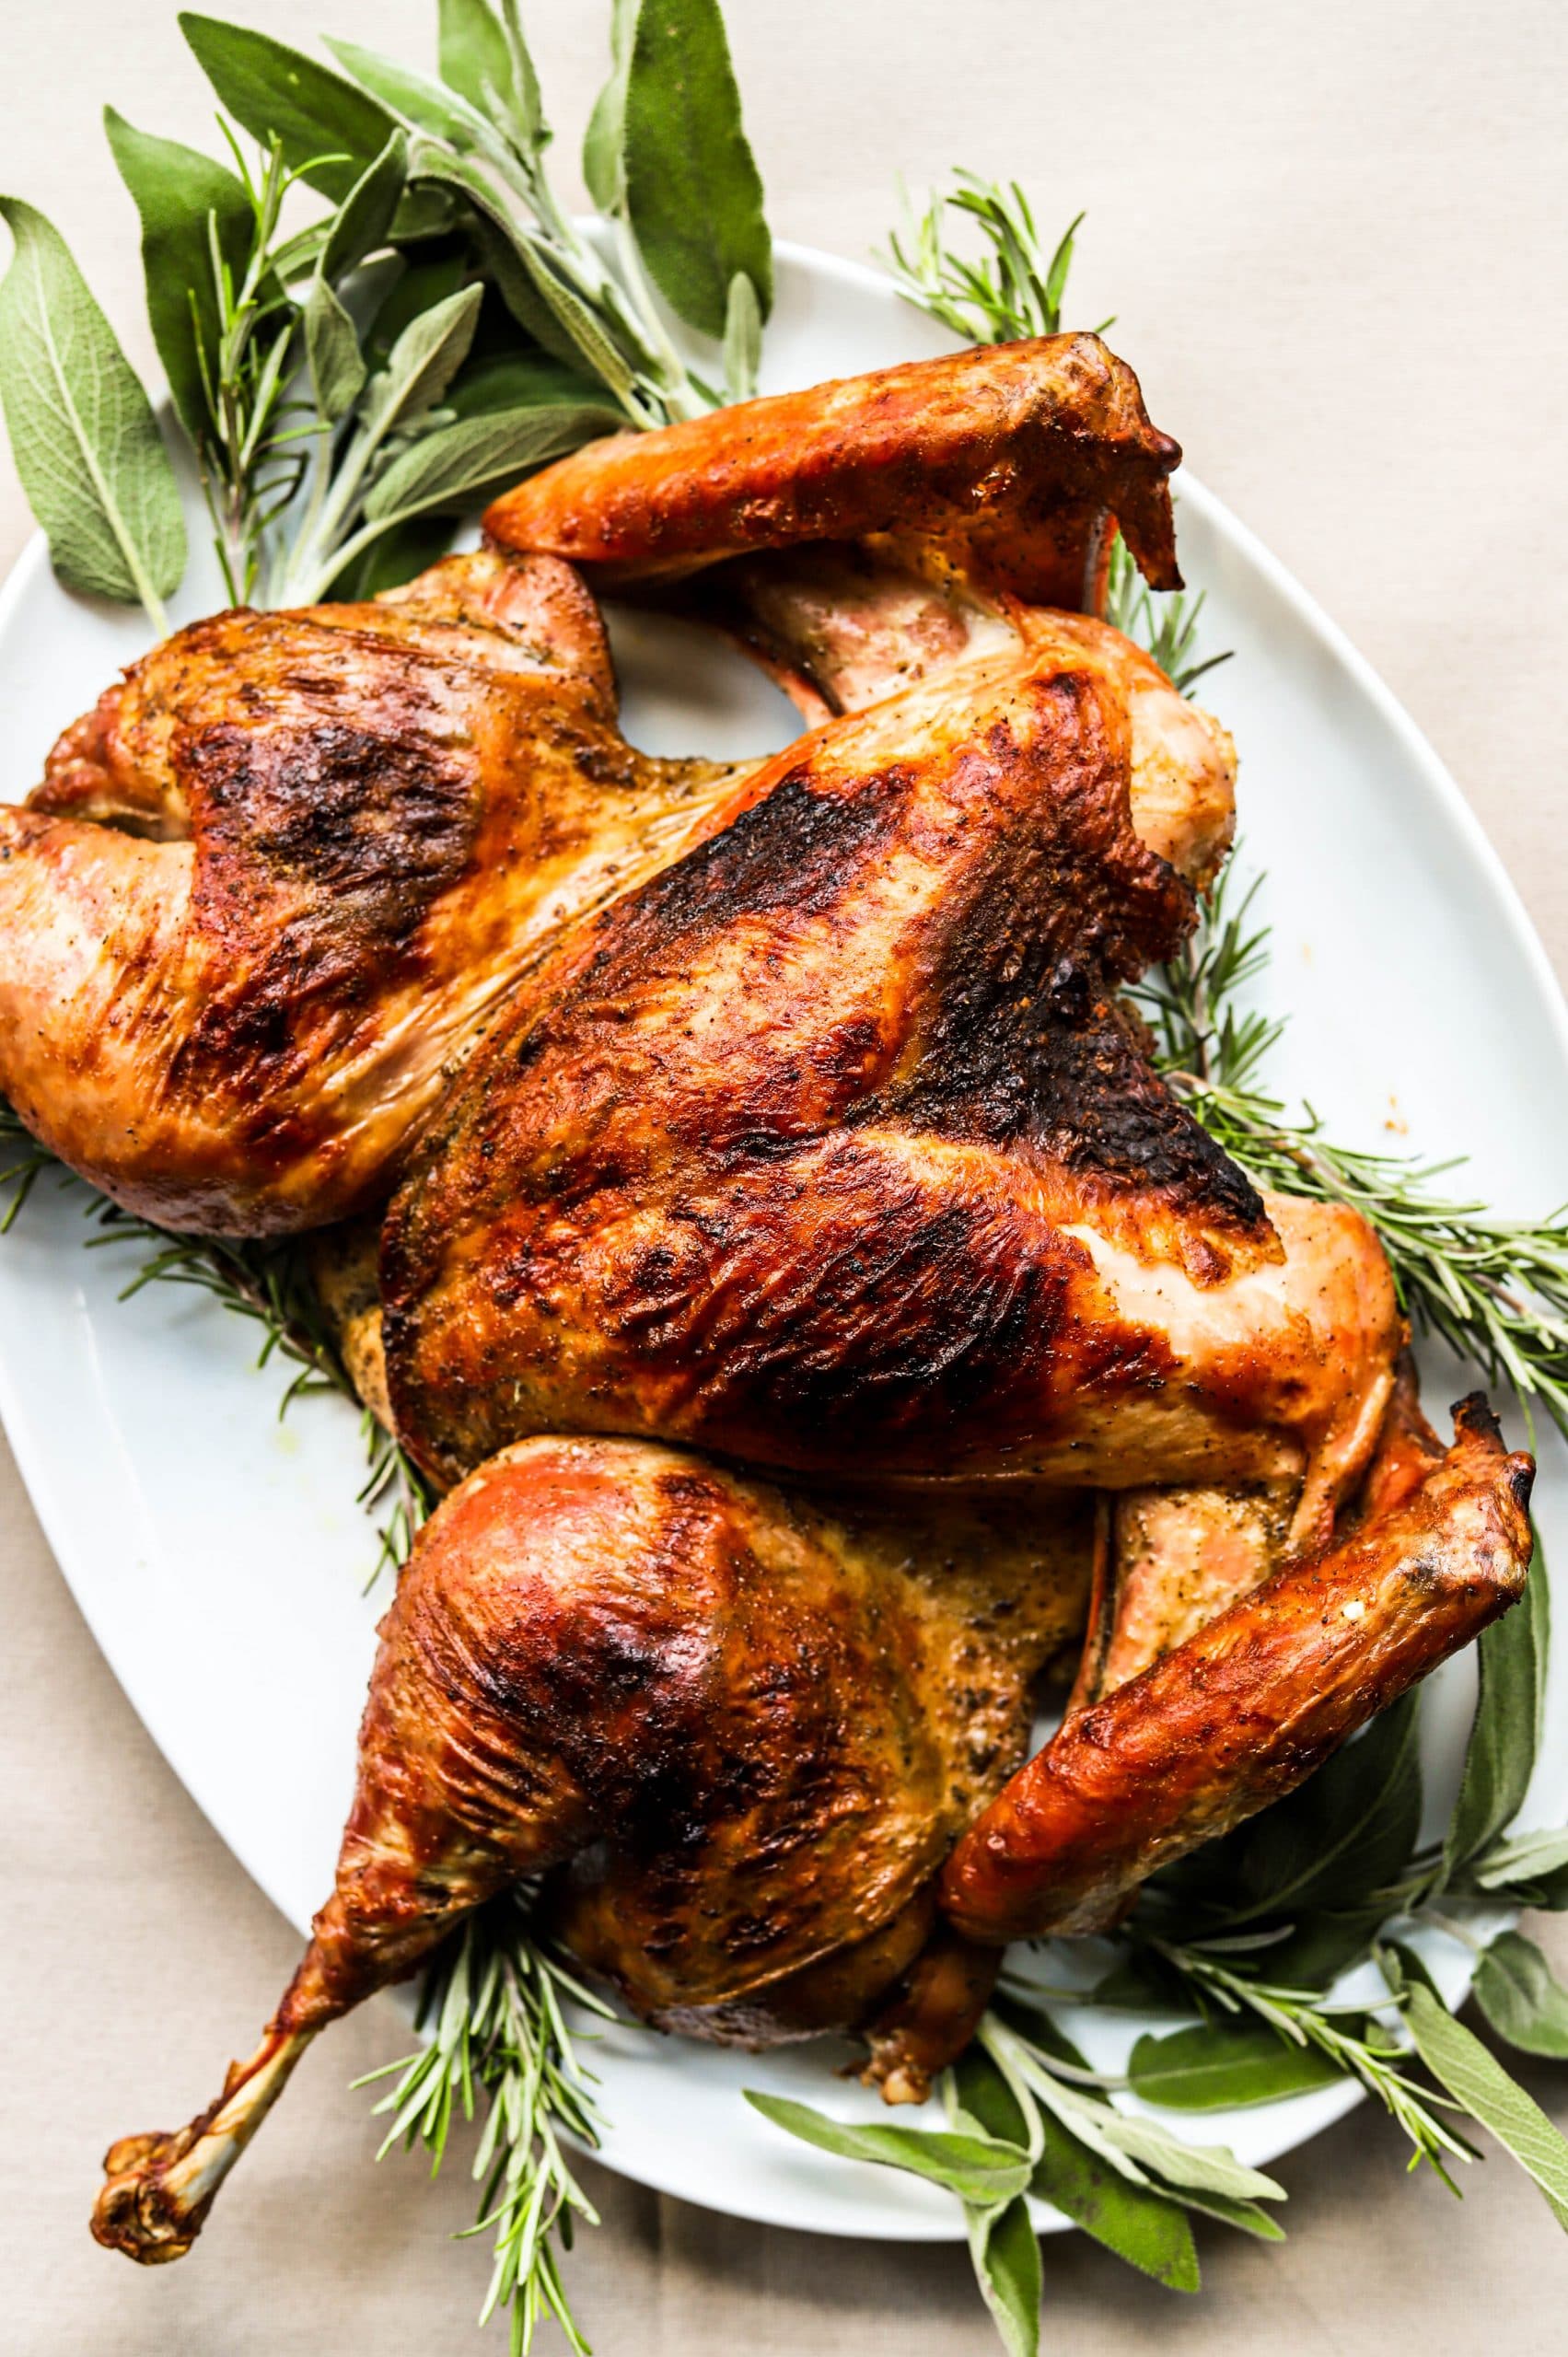
- Faster cooking. A spatchcocked turkey cooks in HALF the time of a traditional turkey. A 14 lb turkey cooks in about 80 minutes if you spatchcock it, but if you don’t, expect about a 3 hour cook time.
- Even cooking. When your turkey cooks flat, you can expect even cooking. No more dry breast meat or undercooked dark meat! All the parts of the bird are evenly exposed and all cook at the same rate.
- Better seasoning. With all the parts of the turkey being easily accessible, it’s easy to season every nook and cranny. Normally, much of the turkey legs are sort of hard to get to and they often go under-seasoned, but not anymore! You’ll be able to get that dry brine everywhere.
- More room in the oven. A flat turkey means you have way more space in the oven! You won’t have to accommodate a giant roasting pan plus a couple of inches for the turkey and so you’ll be able to cook more sides at the same time making Thanksgiving dinner a breeze.
- Crispy skin. When all the parts of the turkey are exposed, all the skin gets crispy. Usually, the legs are not exposed to direct heat leaving you with pale and gummy skin. No more! You’ll have perfectly crispy skin all over.
How to Make Dry Brined Spatchcock Turkey
A dry brined spatchcock turkey will cook up faster and be crispier and juicier than your average bird. You don’t have to be a professional to spatchcock a turkey and a few simple tools are all you need!
Tools Needed
- Heavy Duty Kitchen Shears
- Low-Profile Roasting Pan or Sheet Tray
- Small Stock Pot
- Sharp Knife
- Probe Thermometer
Ingredients Needed
- Turkey. Opt for a fresh or heritage breed turkey that hasn’t been injected with any flavorings or solutions. You can find this information on the packaging label.
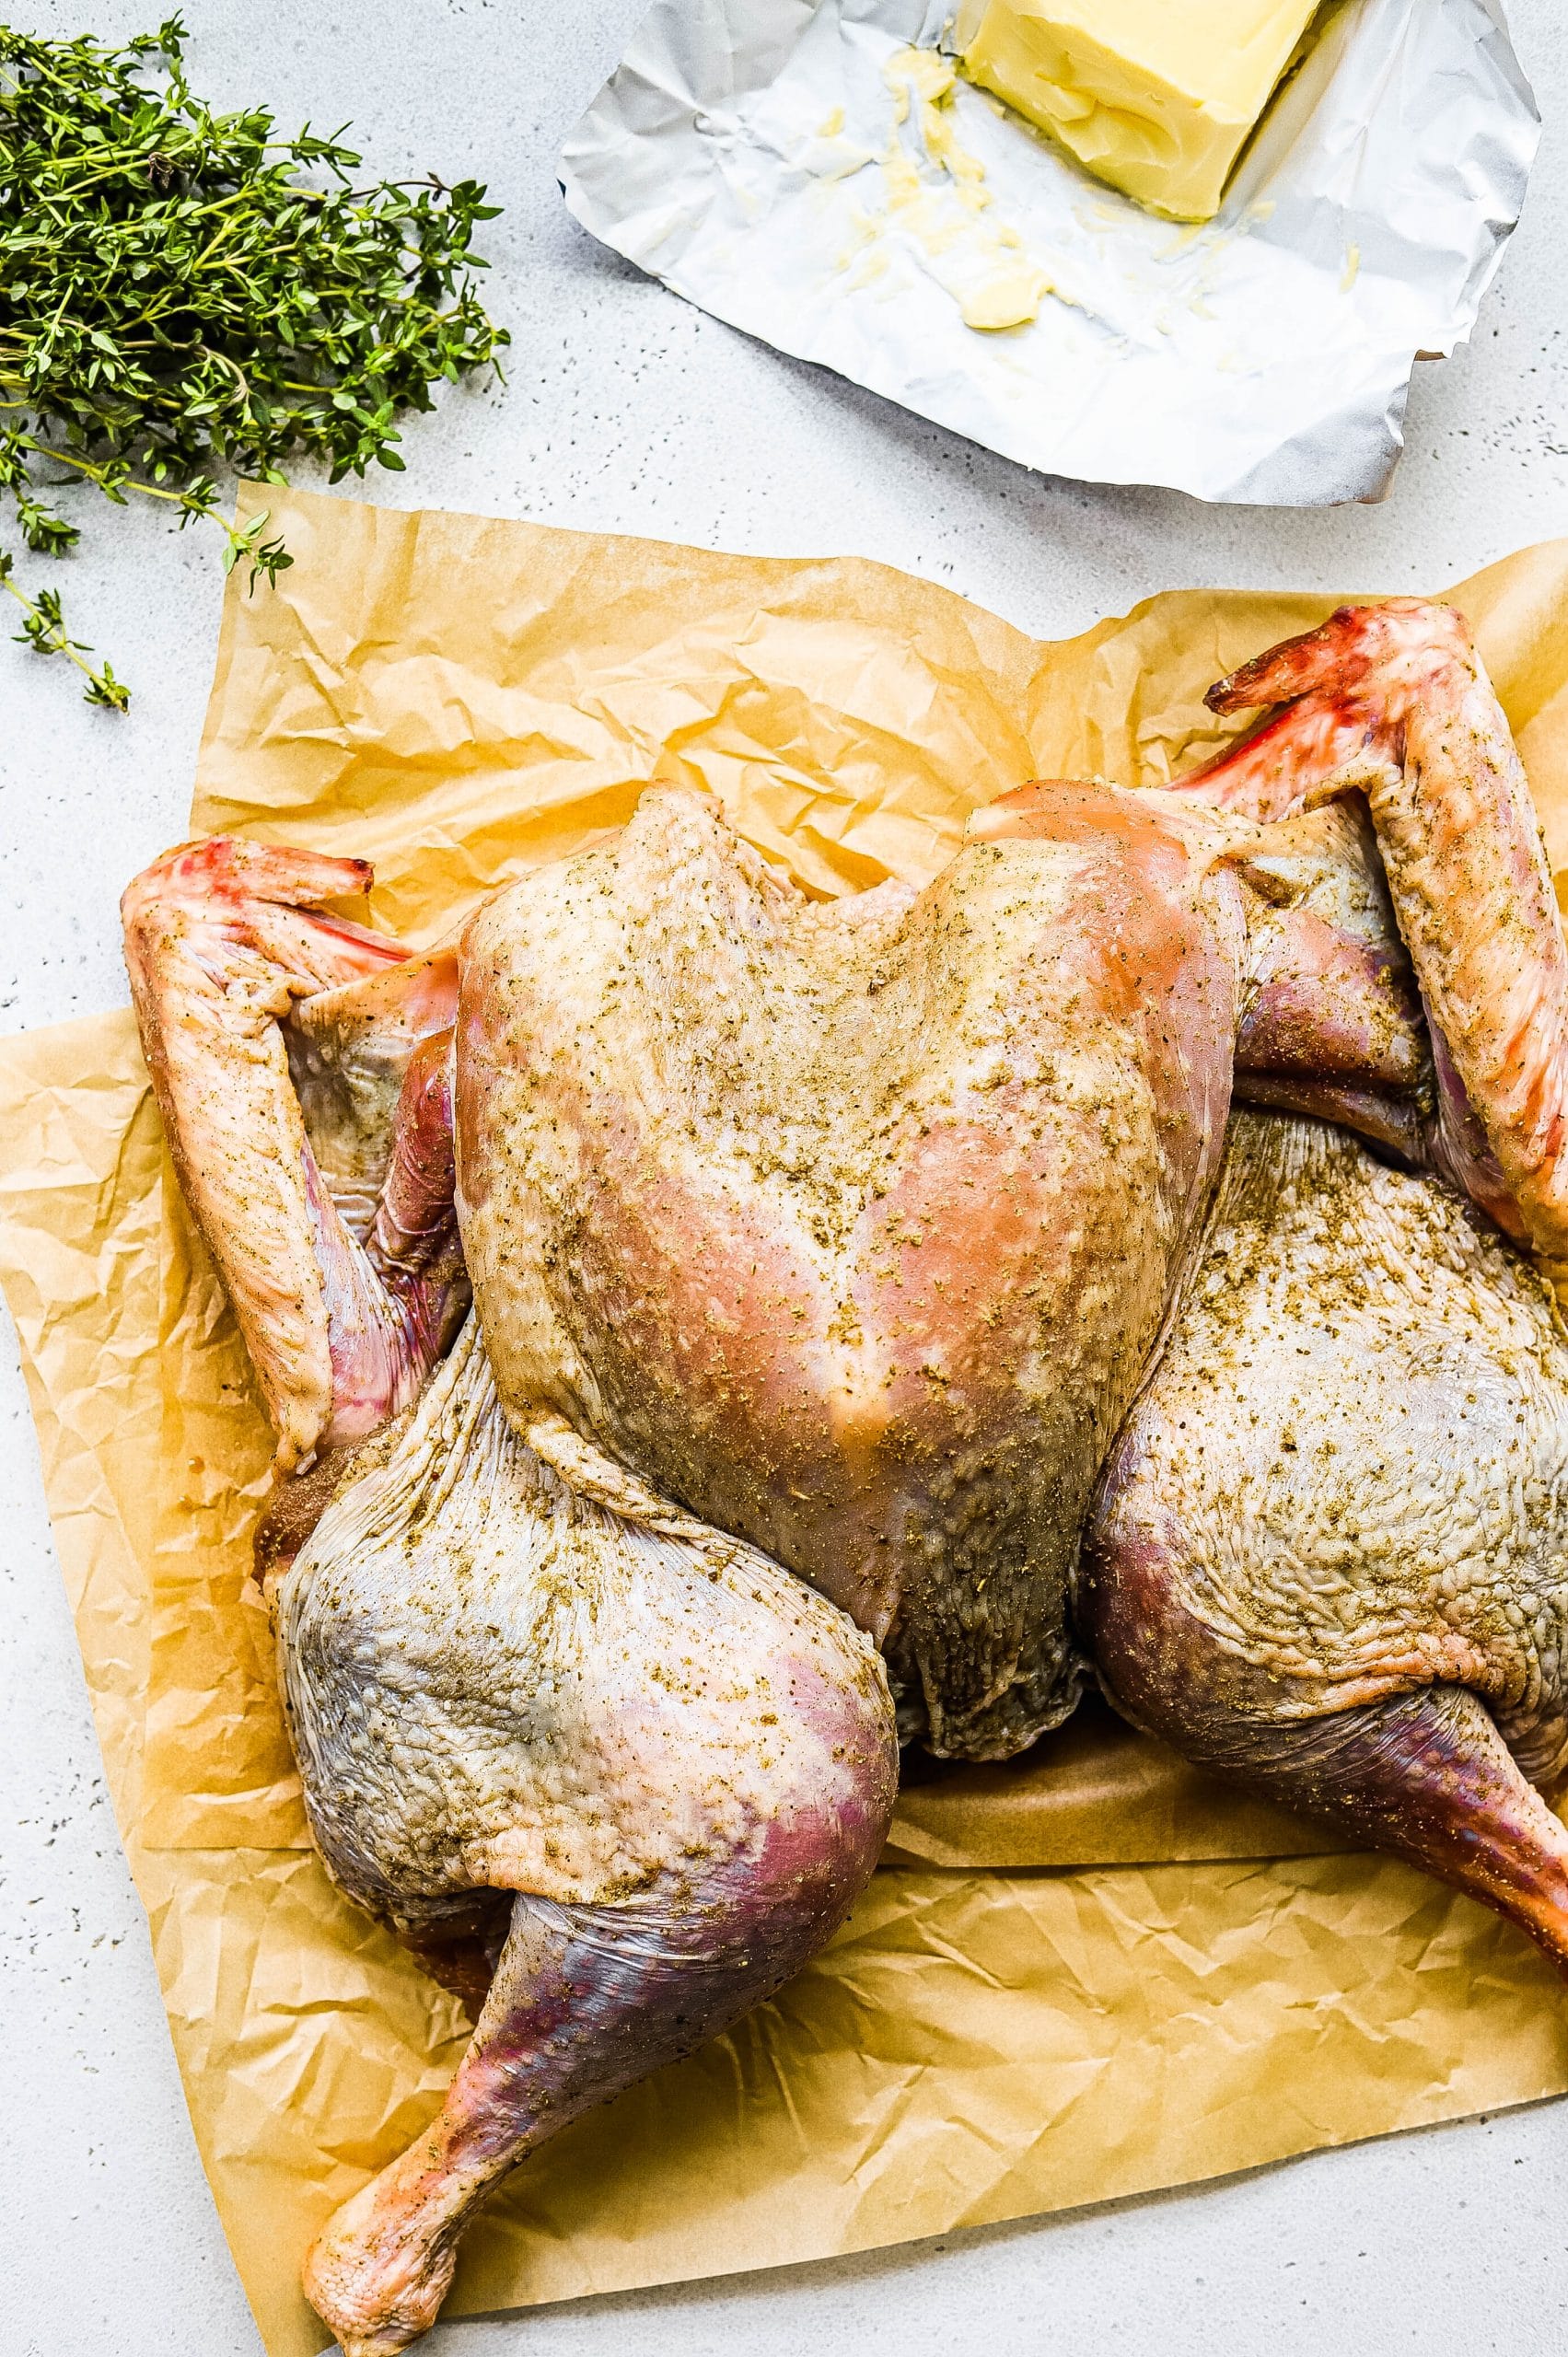
- Salt. I use kosher salt for my brine because it’s coarser. This is super important! If you use finer salt, you’ll need to cut the salt in the dry brine by half. But seriously just buy kosher salt, it’s what most recipes call for these days.
- Spices. Adding spices and dried herbs to the brine is so important for flavor. You can use your favorites but I used a mix of sage, marjoram, brown sugar, granulated garlic, and ground ginger.
- Herbs. Fresh sage, rosemary, and thyme wedged under the bird while roasting add tons of flavor to the pan drippings.
- Veggies. I roast my turkey on a bed of chopped onions, carrots, celery, and fresh herbs. Not only does this flavor the bird, but you get the best pan drippings for gravy.
- Butter or oil. Right before roasting, I smear some butter all over the bird. Alternately, you could drizzle with olive oil. This ensures the crispiest and most flavorful skin.
Selecting the right turkey
Knowing how much turkey to cook for your gathering is essential! It’s best to plan on about 1 lb per person. As I mentioned above, opt for a fresh or heritage breed turkey that hasn’t been injected with any salt solutions. You can verify this information on the packaging but I always recommend supporting your local butcher shops, especially during the holidays.
If you are serving more than 14 people, I recommend cooking 2 turkeys. As you get into much larger birds, they won’t fit in the roasting pan or sheet tray. Two smaller birds will still cook faster than a larger turkey.
How to Spatchcock a Turkey
First, remove the neck and giblets from the turkey and make sure it’s completely defrosted (if using a frozen turkey). Place the turkey on a large cutting board and pat it very dry with paper towels. Arrange the turkey breast-side down on the cutting board with the legs facing you.
Using good-quality kitchen shears, cut along one side of the turkey spine, separating it from the ribs. Be sure to cut as close to the spine as you can so that you do not end up discarding any more of the turkey meat than necessary. Repeat on the other side of the spine.
Flip the turkey so that the breasts face upward and the legs face outward. Using the palm of your hands, press along the breast bone. You should hear a small crack and the bird should lay flat. Watch the video for a quick tutorial.
how to dry brine a turkey
A good rule of thumb is 1 tablespoon of salt for every 5 lbs of meat. I also like to add a touch of brown sugar for balance as well as all my dried herbs and spices. I opted for a traditional flavor with sage, marjoram, garlic, and a touch of ginger for citrus. That being said, feel free to play with your favorite spices! Some great options would be dried herb blends like herbs de Provence, rosemary, thyme, garlic powder, ground mustard, etc.
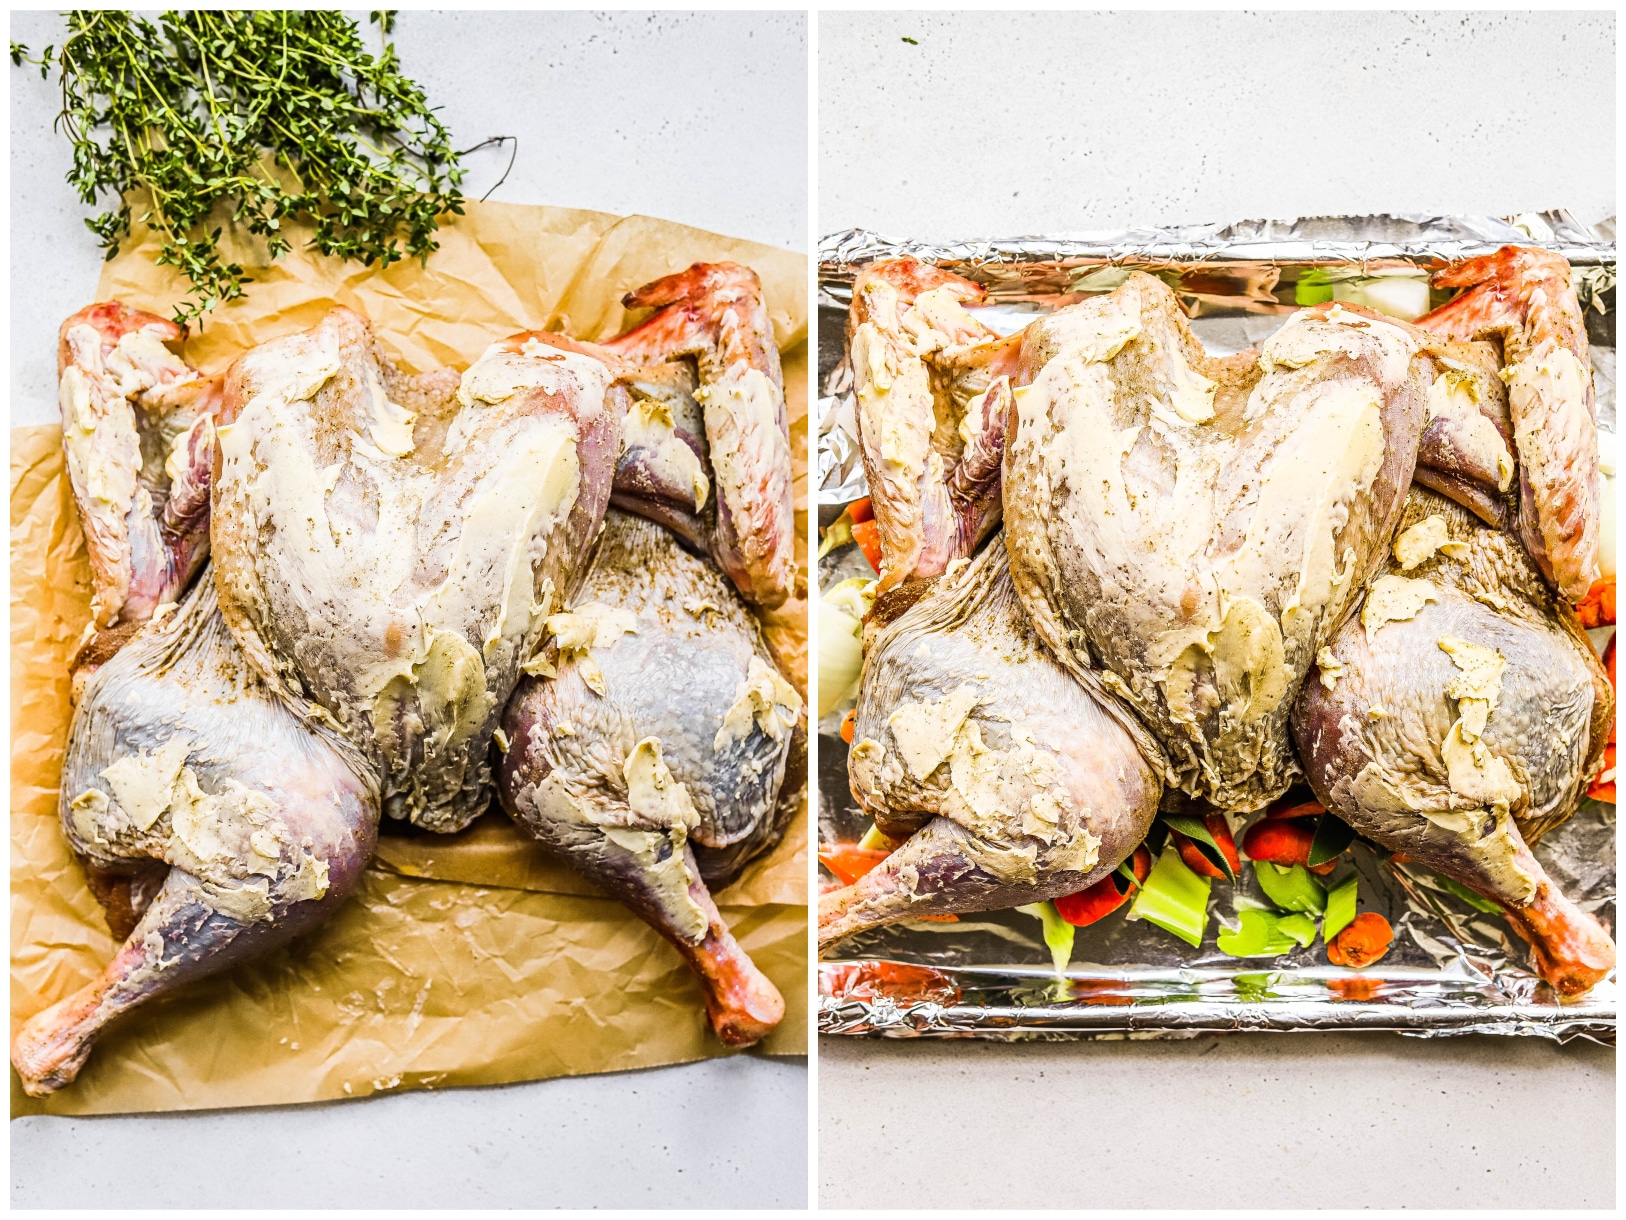
Once you’ve decided on your spice blend, you’re going to rub the whole turkey with it, underside and all. Pull the skin away from the meat a bit with your fingers and really get in there with the dry brine. This is essential for seasoning the meat. After you’ve really coated the bird in the brine, place it breast side up on a rimmed baking sheet covered with foil. Refrigerate it uncovered for at least 24 hours, but 2-3 days yields the best results. Leaving the bird uncovered dries out the skin a bit and this is a must for crispy skin.
How to make Turkey Stock
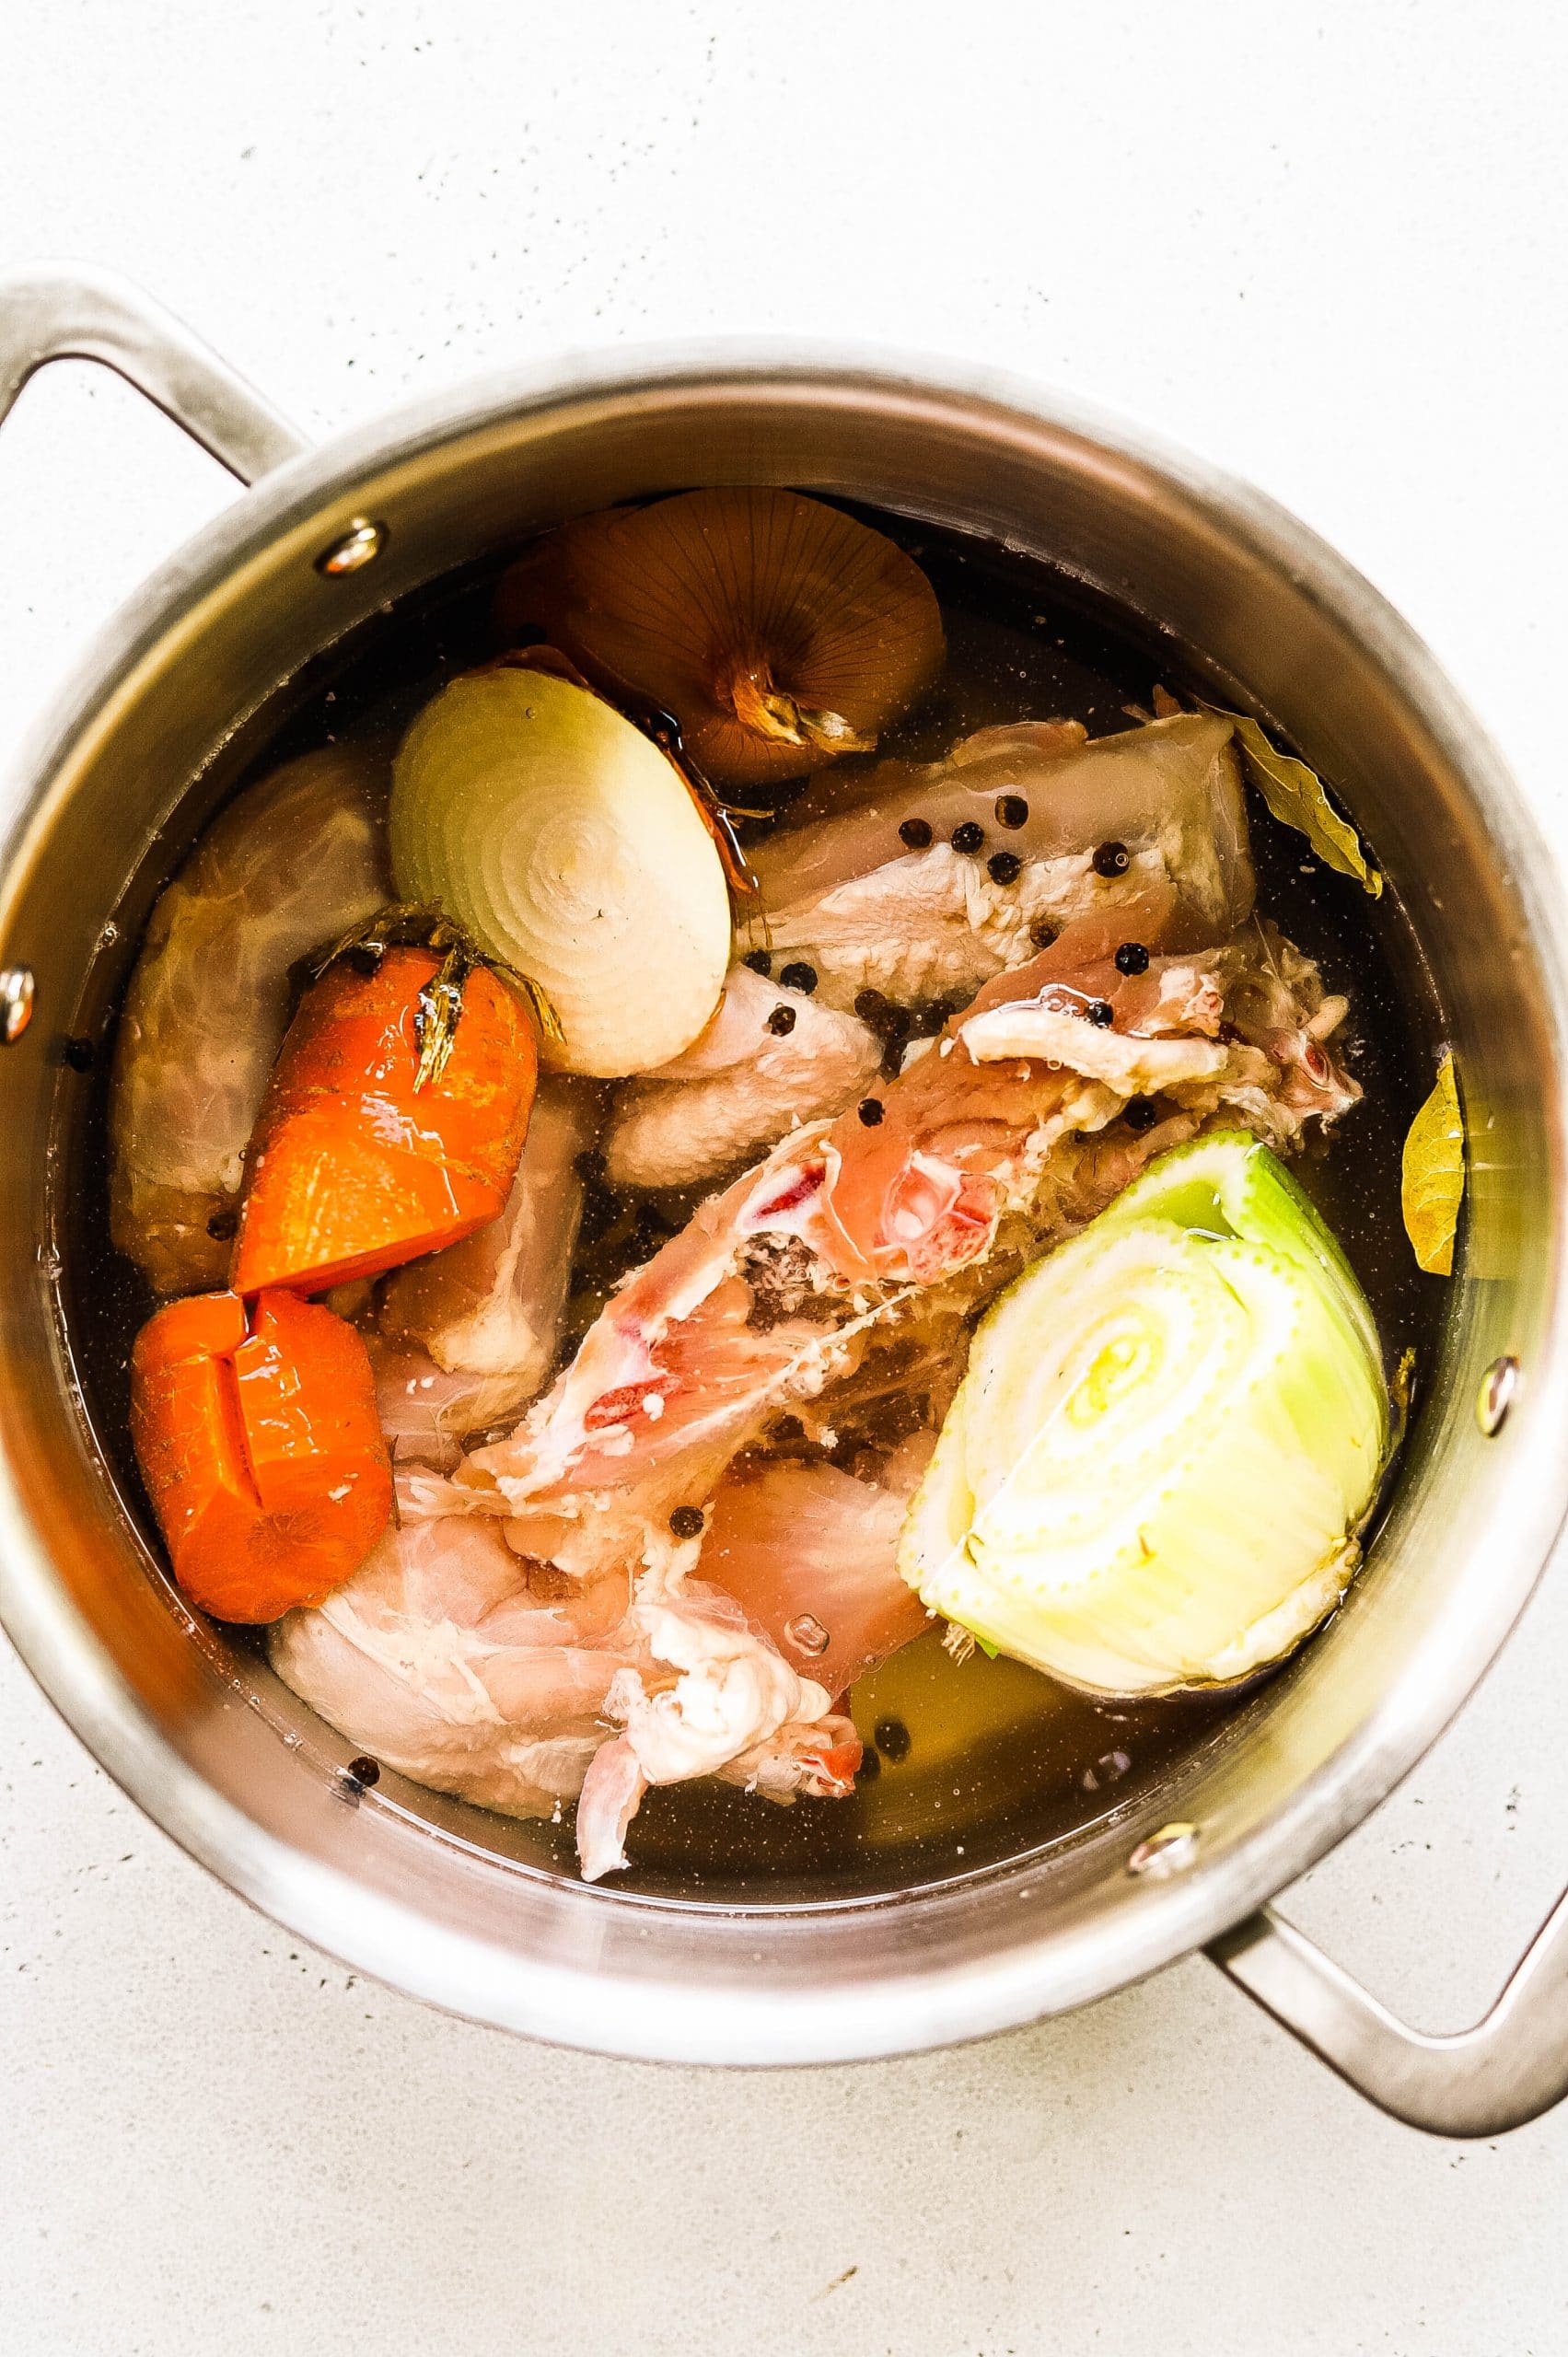
The perfect thanksgiving gravy comes from really great stock, so say goodbye to the boxed turkey stock! You’ve got everything you need to make a better and richer version at home. In a small stockpot (about 8 quarts) add the turkey neck, backbone, and any vegetable odds and ends you have. I opted for the ends of a couple of onions and carrots, the butt of a bunch of celery, along with some peppercorns and bay leaves. I added about 4 quarts of water. The trick to great stock is to really let it simmer for a while and reduce down.
The longer it cooks, the more of the collagen is extracted from the bones and that’s how you get really thick and rich stock, something that the boxed stuff can’t come close to. The goal is to reduce the total volume down to about 3-4 cups. After your turkey stock is reduced, let it cool and strain it into an airtight container. Since you’re brining and spatchcocking your turkey a couple of days in advance, you can make your turkey stock ahead of time so it’s ready for turkey day.
Perfect Gravy for Turkey
After roasting your turkey and while it rests, it’s time to make the gravy. I always make my gravy right before serving because all of my other sides are usually done. As I mentioned above, the key to perfect gravy is a great stock but you also really need the turkey drippings! Remove the turkey from its roasting pan or sheet tray and transfer to a large cutting board. Pour the drippings into a heat-proof container, pressing on the veggies to get all the drippings.
In a medium saucepan, melt 3 tablespoons of salted butter over medium heat. Add 2 tablespoons of all-purpose flour and whisk so that the flour is totally incorporated. Whisk, while cooking, for 2 minutes or so until the flour is turning golden brown.
Add the turkey drippings and whisk until smooth. Slowly stream in the turkey stock, whisking constantly. Bring to a simmer and simmer for 15-20 minutes, stirring occasionally, until it reaches your desired thickness. Remember, it’ll thicken a bit as it cools. Season to taste with salt and lots of black pepper. That’s it! You’ll never have lumpy gravy again.
What to Serve with Dry Brined Spatchcock Turkey
Now that you’ve got the main out of the way, it’s time to talk cocktails, sides, and dessert. Here are all my favorites!
Cocktails
Breads
Sides
-
Caramelized Onion Mashed Potatoes
-
Sausage and Fennel Stuffing
-
Stovetop Mac and Cheese
-
Four Cheese Rigatoni
-
The Best Charcuterie Board
-
Creme Fraiche Mashed Potatoes
-
Pumpkin Risotto with Bacon and Gouda
Desserts
-
Pumpkin Creme Brulee
-
Salted Caramel Pumpkin Pie Bars
-
Easy Skillet Apple Crisp
-
Salted Chocolate Pecan Pie
-
Slice and Bake Chocolate Chunk cookies
This post contains affiliate links from which I receive a small commission at no additional cost to you. Affiliate links allow me to keep providing great recipes for free and I never recommend products that I don’t love and personally own.
Dry Brined Spatchcock Turkey
Ingredients
Dry Brine
- 2 1/2 tablespoons kosher salt*
- 1 tablespoon brown sugar
- 1 teaspoon ground white pepper
- 2 teaspoons rubbed sage
- 2 teaspoons ground marjoram
- 1 teaspoon garlic powder
- 1 teaspoon ground ginger
Turkey
- 12-14 lb fresh or heritage turkey spatchcocked (see above)
- Dry Brine recipe above
- 4 oz 1 stick salted butter, at room temperature
- 1 onion chopped
- 3 large carrots chopped
- 4 celery ribs chopped
- 2 fresh bay leaves
- 1 bunch fresh sage
- 1 bunch fresh thyme
- 2 sprigs of fresh rosemary
Gravy
- 3 tablespoons unsalted butter
- 2 tablespoons all-purpose flour
- Turkey Drippings
- 3 cups turkey stock see above for instructions, warmed
- Kosher Salt
- Freshly ground black pepper
Instructions
- Whisk the dry brine ingredients together in a small bowl.
- Line a rimmed baking sheet with foil and place the turkey, breast side up, on the sheet. Using your fingers, separate the skin from the meat of the turkey. Rub the bird all over with the dry brine, including under the skin and on the underside of the bird. Refrigerate uncovered for at least 24 hours, but 2-3 days yields the best results.
- Preheat an oven to 400 F. In a large roasting pan or a large rimmed baking sheet lined with foil, mix the onions, carrots, and celery together. Top with the bay leaves, sage, thyme, and rosemary. Remove the dry brined turkey from the fridge and place it on top of the veggies. Smear the softened butter all over the skin and under it, evenly coating the turkey.
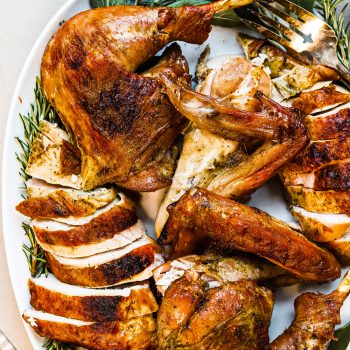
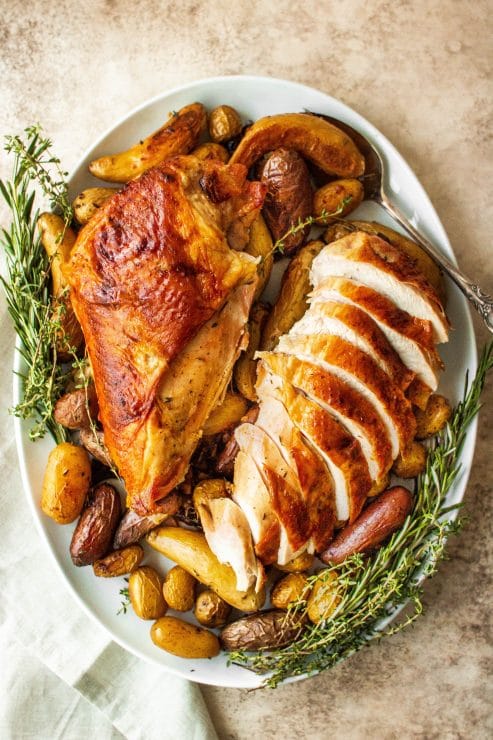
- Roast until a probe thermometer registers 165 F at the thickest part of the thigh and 155 F at the thickest part of the breast, about 70-80 minutes. Remove from the oven and transfer to a cutting board and lightly tent with foil. Rest 20-30 minutes before slicing.
- Pour the turkey drippings from the pan into a heat-safe container, pressing on the veggies to extract as much as possible. Set aside for the gravy.
- To make the gravy: In a medium saucepan, melt the butter over medium heat. Add the flour and whisk to combine. Cook, whisking constantly, for 2 minutes. Gradually whisk in all the turkey drippings. Whisk in the warm turkey stock until totally smooth with no lumps. Bring to a simmer and simmer over low heat for 15-20 minutes, until desired thickness. Season to taste with salt and pepper.
Rate & Review This Recipe
Wow! Jenny made this impossible to mess up! My first Turkey ever and I received outstanding compliments that it was the best Turkey ever! It is work but the work is so worth it!!!
Best thanksgiving turkey I’ve ever made!! I will never use wet brine ever again
I followed this recipe for my thanksgiving turkey and it turned out delicious! I smoked my bird and that brought out even more of the flavors with a nice smoky touch.
After dry brining my turkey, I originally placed it covered in the fridge. Then, I reread this recipe that made it clear that it should be UNCOVERED so that it can dry out and get crispy skin. If Jenny hadn’t explained why keeping it uncovered was so important, I probably wouldn’t have gotten my lazy butt off the couch to go uncover it. I’m so glad I did because the skin turned out crispy and ultra tasty!
Used this recipe a few days ago for a 20# turkey. Spatchcocking a turkey takes commitment, but this recipe makes it worth the effort! As the recipe says, it’s better to leave the turkey to brine in the very flavorful dry rub for 2-3 days. I roasted mine on a quartered onion that I then chopped and used in a cider gravy with the drippings. Total cook time for my larger turkey was about 2 hours, 20 mins.
Leftovers the next day? Outstanding!
Love this! Thanks, Robin!
Thanks for the recipe. I’m giving the spread-eagle turkey a try!
Yay! I’d love to hear how it turns out!
I seriously love how informative everything is! Thank you!! This gives a lot more confidence to approach the holidays!
Thank you so much, Monique!